Juniper vs Cisco vs Nokia(formerly Alcatel) SR show commands
Juniper vs Cisco vs Nokia(formerly Alcatel) SR show commands
Most of the companies have multi-vendor routers in their network. In order to make troubleshooting easy we would like to list down shows commands of Juniper, Cisco and Nokia (Formerly Alcatel) Service Router in this post.
OSPF Commands:
Juniper
Cisco IOS
Alcatel SR
show ospf neighbor
sh ip ospf neighbor
show router ospf neighbor
show ospf neighbor extensive
sh ip ospf neighbor detail
show router ospf neighbor detail
clear ospf neighbor all
clear ip ospf <> process
clear router ospf neighbor
show ospf statistics
sh ip ospf statistics
show router ospf statistics
show ospf interface
sh ip ospf interface brief
show router ospf interface
show ospf interface extensive
sh ip ospf interface
show router ospf interface detail
show route protocol ospf
sh ip route ospf
show router ospf routes
show ospf database
sh ip ospf database
show router ospf database
show ospf database router advertising-router <x.x.x.x>
sh ip ospf database adv-router <x.x.x.x>
show router ospf database adv-router <x.x.x.x>
BGP Commands:
Juniper
Cisco
Alcatel SR
show bgp summary
sh ip bgp summary
show router bgp summary
show bgp neighbor
sh ip bgp neighbors
show router bgp neighbor
show route protocol bgp
sh ip route bgp
show router route-table protocol bgp
show route receive-protocol bgp <x.x.x.x>
sh bgp ipv4 unicast neighbors <x.x.x.x> received-routes
show router bgp neighbor <x.x.x.x> received-routes
show route advertising-protocol bgp <x.x.x.x>
sh bgp ipv4 unicast neighbors <x.x.x.x> advertised-routes
show router bgp neighbor <x.x.x.x> advertised-routes
This knowledge base serves as an easy-to-follow guide for configuring repository URLs for CentOS 7 and CentOS 8. It uses repository lists from the CentOS vault mirror, ensuring that these repositories remain accessible even after the OS has reached its end of life. Ideal for system administrators, developers, and CentOS enthusiasts, this guide guarantees effortless access to repository URLs for BaseOS, AppStream, Extras, CentOSPlus, and more, ensuring your CentOS machines are properly configured.
How to Configure a Repo in CentOS?
Before modifying the repository files, ensure you have appropriate backup procedures in place:
To modify the repository sources, open the respective repository configuration file (/etc/yum.repos.d/CentOS-Base.repo) using your preferred text editor:
sudo vi /etc/yum.repos.d/CentOS-Base.repo
eplace the content in the file with the configurations listed below based on your CentOS version.
CentOS 7
To configure the working repositories for CentOS 7, add the following to your /etc/yum.repos.d/CentOS-Base.repo file:
٤ مارس ٢٠٢٤ يوم تاريخي في القطاع الرقمي في المملكة العربية السعودية
أعلنت أمازون ويب سيرفيسز (AWS) للتو عن بدء العمل علي إطلاق خدماتها في المملكة العربية السعودية. تمثل هذه الخطوة الضخمة حقبة جديدة من التحول الرقمي، مما يجعل النظام الأساسي السحابي الأكثر شمولاً والأوسع انتشارًا في العالم في متناول يدك مباشرةً. يعد توسع AWS في المملكة العربية السعودية بمثابة تغيير جذري لقواعد اللعبة بالنسبة للشركات في جميع أنحاء المنطقة، حيث يوفر وصولاً لا مثيل له إلى التقنيات المتقدمة والبنية التحتية السحابية.
You need to integrate GitHub as a source code repository for WebApp1.
What should you use?
Select only one answer.
Deployment Center I chose (chatGpt, bard)Probably correct answer
Deployment slots
Extensions
Service Connector
Question 5 of 26
You plan to create an Azure container instance named container1 that will use a Docker image named Image1.
You need to ensure that container1 has persistent storage.
Which Azure resources should you deploy for the persistent storage?
Select only one answer.
an Azure container registry
an Azure SQL database
an Azure Storage account and a blob container I chose
an Azure Storage account and a file share (chatGpt, bard, bing)Probably correct answer
Question 6 of 26
You have an Azure container registry that stores an image named Image1 and a Windows Server 2022 Azure virtual machine named VM1.
You need to ensure that you can run Image1 in VM1.
What should you install in VM1?
Select only one answer.
Azure Portal
Docker I chose (chatGpt, bard, bing)Probably correct answer
Hyper-V role
.NET Framework 4.7
Question 7 of 26
You have Azure subscription that includes virtual network named VNet1 in West US region.
You plan to deploy following container instances:
Instance1, running Windows container image in West US region
Instance2, running Linux container image in West US region
Instance3, running Windows container image in East US region
Which container instances can be deployed to VNet1?
Select only one answer.
Instance1 and Instance2 only I chose (bard)
Instance1 and Instance3 only
Instance1, Instance2 and Instance3 (chatGpt)
Instance1 only
Instance2 only (bing)Probably correct answeranswer link
Question 8 of 26
You have an Azure Storage account named storage1.
You create the following encryption scopes for storage1:
Scope1 that has an encryption type of Microsoft-managed keys
Scope2 that has an encryption type of Customer-managed keys
Which storage services can be used with Scope2?
Select only one answer.
blob and file only I chose (chatGpt, bard)Probably correct answer
blob, file, table, and queue
blob only
file only
table and queue only
Question 9 of 26
You have an Azure Storage account named storage1 that is configured to use the Hot access tier.
Storage1 has a container named container1 and the lifecycle management rule with following settings:
Move blob to cool storage: Selected
Days after last modification: 3
Move blob to archive storage: Selected
Days after last modification: 5 On December 1, you create a file named File1 in container1. On December 10, you rehydrate File1 and move the file to the Hot access tier.
When will File1 be moved to archive storage?
Select only one answer.
on December 15 (chatGpt, bard, bing)Probably correct answer
on December 18 I chose
on January 1
within 24 hours
Question 10 of 26
You have an Azure subscription that contains the following storage accounts:
storage1, configured as StorageV2 kind
storage2, configured as BlobStorage kind
storage3, configured as FileStorage kind
Which storage account or storage accounts can you use Lifecycle management?
Select only one answer.
storage1 and storage2 only I chose (chatGpt, bard)Probably correct answer
storage1 and storage3 only
storage1 only
Storage1, storage2 and storage3
storage2 and storage3 only
Question 11 of 26
You have an Azure storage account that contains a blob container named container1.
You need to configure access to container1.
Which authorization types can you use?
Select only one answer.
Microsoft Entra ID only
Microsoft Entra ID, shared access signature or certificate only
Microsoft Entra ID, storage key or shared access signature only
Microsoft Entra ID, storage key, shared access signature or certificate I chose (chatGpt, bard)Probably correct answer
Storage key or shared access signature only
Question 12 of 26
You have an Azure subscription that contains a storage account named storage1 and the following virtual machines:
VM1 has a public IP address of 13.68.158.24 and is connected to VNET1/Subnet1
VM2 has a public IP address of 52.255.145.76 and is connected to VNET1/Subnet1
VM3 has a public IP address of 13.68.158.50 and is connected to VNET1/Subnet2
The subnets have the following service endpoints:
Subnet1 has a Microsoft.Storage service endpoint
Subnet2 does NOT have any service endpoint
Storage1 has a firewall configured to allow access from the 13.68.158.0/24 IP address range only.
Which virtual machines can access storage1.
Select only one answer.
VM1 and VM2 only (bing)
VM1 and VM3 only I chose (chatGpt)
VM1 only (bard)Probably correct answer
VM1, VM2, and VM3
VM3 only
Question 13 of 26
You have an Azure subscription that includes the following resources:
VNet1, a virtual network
Subnet1, a subnet in VNet1
WebApp1, a web app application service
NSG1, a network security group You create an application security group named ASG1.
Which resource can use ASG1?
Select only one answer.
NSG1 I chose (chatGpt, bing)Probably correct answer
Subnet1
VNet1
WebApp1 (bard)
Question 14 of 26
You have an Azure subscription that contains the following fully peered virtual networks:
VNet1, located in the West US region. 5 virtual machines are connected to VNet1.
VNet2, located in the West US region. 7 virtual machines are connected to VNet2.
VNet3, located in the East US region, 10 virtual machines are connected to VNet3.
VNet4, located in the East US region, 4 virtual machines are connected to VNet4. You plan to protect all of the connected virtual machines by using Azure Bastion.
What is the minimum number of Azure Bastion hosts that you must deploy?
You have an Azure virtual network named VNET1 that is connected to a network security group (NSG) named NSG1. NSG1 has the following inbound security rules:
Rule1 has a priority of 100 and allows port 3389 on TCP protocol from any source and to any destination
Rule2 has a priority of 200 and allows ports 80 and 8080 on UDP protocol from any source and to any destination
Rule3 has a priority of 300 and denies ports 1-2000 on TCP protocol from any source and to any destination
Rule4 has a priority of 400 and allows ports 50-500 on TCP protocol from VirtualNetwork source and to any destination
Rule5 has a priority of 500 and allows ports 80 and 443 on TCP protocol from any source and to any destination You need to allow http and https connections from the internet to VNET1.
What should you change for NSG1?
Select only one answer.
Priority for Rule3 to 450
Priority for Rule4 to 250
Priority for Rule5 to 250 I chose (chatGpt, bard)Probably correct answer
Protocol for Rule2 to TCP
Question 16 of 26
You have a Recovery Services vault named Vault1 that has soft delete enabled. Vault1 stores backups for the following Azure resources:
an Azure virtual machine named VM1
an Azure file share named share1
a SQL Server on Azure virtual machine named SQL1
Which backups are protected by soft delete?
Select only one answer.
share1 only
VM1 and SQL1 only I chose (chatGpt, bing)Probably correct answer
VM1 only
VM1, share1, and SQL1 (bard)
Question 17 of 26
You have a Windows Server Azure virtual machine named VM1.
You need to back up two folders in VM1 by using Azure Backup. The solution should minimize administrative effort.
You have an Azure virtual machine named Computer5 and a Recovery Services vault named Vault5. Computer5 contains the following data disks:
DiskA has a size of 512 GB
DiskB has a size of 30 TB
DiskC has a size of 26 TB
DiskD has a size of 2.0 TB
Which data disks can you back up to Vault5?
Select only one answer.
DiskA, DiskB, DiskC, and DiskD I chose (chatGpt, bing)Probably correct answer
DiskA only (bard)
DiskB only
DiskC only
DiskD only
Question 19 of 26
You recently create an Azure virtual machine standard backup policy.
You need to configure a retention period for virtual machine instant recovery snapshots.
What is the maximum number of days that can be set for the retention period?
Select only one answer.
5 I chose (bing)Probably correct answer
7 (chatGpt)
14
30 (bard)
Question 20 of 26
You have an Azure subscription.
You plan to run a data warehouse in an Azure virtual machine named VM1. You need to ensure that VM1 is optimized for running a data warehouse.
Which VM type should you use for VM1?
Select only one answer.
Compute optimized (F-Series)
General purpose (D-Series)
High performance computing (H-Series)
Memory optimized (M-Series) I chose (chatGpt, bard, bing)Probably correct answer
Storage optimized (Ls-Series)
Question 21 of 26
You have an Azure subscription that contains the following resources:
A resource group named RG1 in the West US region
A resource group named RG2 in the Central US region
A virtual network named VNet1 that is deployed to the West US region in RG1
A virtual network named VNet2 that is deployed to the Central US region in RG1
A virtual network named VNet3 that is deployed to the West US region in RG2 You need to deploy a virtual machine named VM1 to RG1 in the West US region.
To which virtual network or virtual networks can you connect VM1?
Select only one answer.
VNet1 only I chose (chatGpt, bard)Probably correct answer
VNet1 or VNet2 only
VNet1 or VNet3 only
VNet1, VNet2 or VNet3
Question 22 of 26
You have an Azure virtual machine named VM1.
VM1 contains the following:
a File named File1 that is stored on volume C:\
a File named File2 that is stored on volume D:\
an App named App1 that is in a running state
a user named User1 that is connected to VM1 You plan to resize VM1.
What is preserved after the resize?
Select only one answer.
File1 and File2 only
File1 and the state of App1 only I chose (chatGpt, bard)Probably correct answer
File1, File2 and the state of App1 only
File1, File2, the state of App1 and the connection of User1
File1 only
Question 23 of 26
You have an Azure subscription and an availability set named AS1 that has 5 update domains.
You deploy 27 virtual machines to AS1.
After a planned update, what is the minimum number of virtual machines that are available?
Select only one answer.
14
20
21
22 I chose (bard, bing)Probably correct answer
26 (chatGpt)
Question 24 of 26
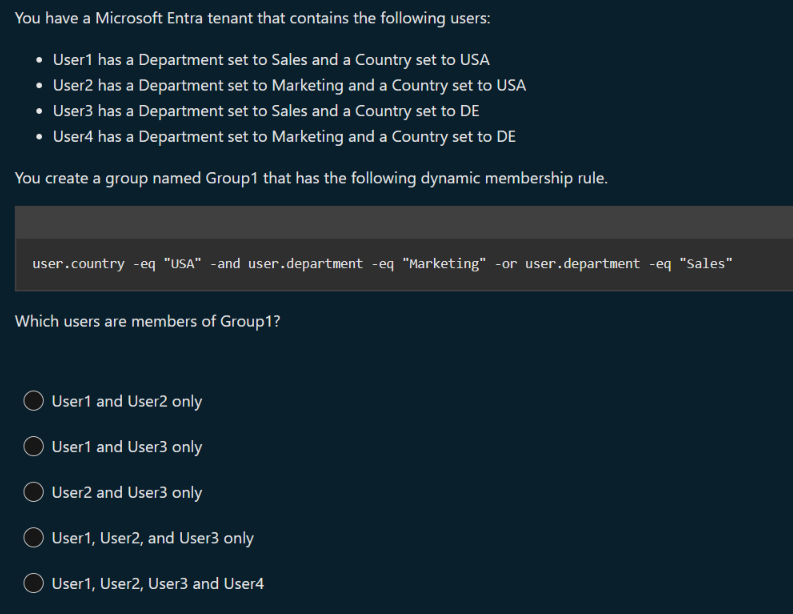
You have a Microsoft Entra tenant named contoso.com that contains a user named Ben Smith.
You configure a Password protection for contoso.com that includes the following Custom banned passwords settings:
Enforce custom list: Yes
Custom banned password list: Contoso
Which password can be used by Ben Smith?
Select only one answer.
C0nt0s0123 (bard)
CONTOSO123
Conto123so I chose
FgRs01 (chatGpt, bing)Probably correct answer
Question 25 of 26
You have a Microsoft Entra tenant.
You create a user named Admin1. You need to ensure that Admin1 can perform following tasks:
Assign licenses to Microsoft Entra groups
Reset passwords of Microsoft Entra users
What Microsoft Entra role should you add to Admin1?
Select only one answer.
Billing Administrator
Helpdesk Administrator (bard)
License Administrator I chose (chatGpt)
User Administrator (bing)Probably correct answer
Question 26 of 26
You have an Azure subscription that contains a user named User1, a resource group named RG1, and a virtual machine named VM1.
You enable a system-assigned managed identity for VM1.
To which identities can you assign the Reports Reader role?
Select only one answer.
User1 and RG1 only
User1 and VM1 only I chose (chatGpt, bing)Probably correct answer
User1 only
User1, RG1, and VM1 (bard)
Question 1 of 26
You have an Azure web app named Contoso2023.
You add a deployment slot to Contoso2023 named Slot1. You need to be able to perform a deployment slot swap with preview.
What should you modify?
Select only one answer.
application settings for Contoso2023
application settings for Contoso2023-Slot1 I chose (bing)
general settings for Contoso2023
general settings for Contoso2023-Slot1
Question 3 of 26
You have an Azure subscription that includes a virtual network named VNet1.
You plan to create a web app named WebApp1 and deploy it to VNet1. You need to prepare the environment for the planned web app. The solution must minimize costs.
Which app service plan size should you use?
Select only one answer.
Dev / Test B1 I chose (bing)
Dev / Test F1
Isolated I1V2
Production P1V2
Production P3V3
Question 4 of 26
You have an Azure subscription that includes the following web apps:
WebApp1, which runs code in a Windows operating system.
WebApp2, which runs code in a Linux operating system.
WebApp3, which runs in a Docker container on Windows.
WebApp4, which runs in a Docker container on Linux.
From which web apps can you use WebJobs?
Select only one answer.
WebApp1 and WebApp2 only
WebApp1 and Web3 only I chose (bing)
WebApp1 only
WebApp1, WebApp2, WebApp3 and WebApp4
Question 5 of 26
You have an Azure container registry named Registry1.
You create a container image named image1 on a Windows Server container host named Host1. You need to store image1 in Registry1.
Which URL should you use to push image1 from Host1?
Select only one answer.
azure.microsoft.com/Registry1
Registry1.azurecr.io I chose (bing)
Registry1.file.core.windows.net
Registry1.onmicrosoft.com
Question 12 of 26
You have an Azure subscription that contains a virtual network named VNET1. VNET1 uses the following address spaces:
10.10.1.0/24
10.10.2.0/28
VNET1 contains the following subnets:
Subnet1- has an address space of 10.10.1.0/24
Subnet2- has an address space of 10.10.2.0/28 To Subnet1, you deploy a virtual machine named VM1 that runs Windows Server 2022. VM1 has Remote Desktop enabled. VM1 does NOT have a public IP address. You need to be able to deploy Azure Bastion to protect VM1.
What should you do first?
Select only one answer.
Add a new subnet to VNET1. I chose (bing)
Add a public IP address to VM1.
Add an extension to VM1.
Modify the address space of VNET1.
Question 14 of 26
You have an Azure subscription that contains a virtual machine named VM1 and a storage account named storage1.
You need to ensure that VM1 can access storage1 by using the Azure backbone.
What should you configure?
Select only one answer.
a routing table
a service endpoint I chose (bing)
a VPN gateway
Peering
Question 15 of 26
You have an Azure subscription that includes following resources:
VNet1, a virtual network
Subnet1, a subnet in VNet1
VM1, a virtual machine
NIC1, a network interface of VM1
LB1, a load balancer You create a network security group named NSG1.
To which two Azure resources can you associate NSG1?
Select all answers that apply.
LB1
NIC1 I chose (bing)
Subnet1 I chose (bing)
VM1
VNet1
Question 16 of 26
You have an Azure subscription that contains the following virtual machines:
VM1, a virtual machine that runs Windows Server 2019
VM2, a virtual machine that runs Red Hat Enterprise Linux
VM3, a virtual machine that is configure with Azure Disk encryption and runs Windows Server 2022 You use Azure Backup to back up the three virtual machines.
Which virtual machine or virtual machines can use file-level restore?
Select only one answer.
VM1 and VM2 only I chose (bing)
VM1 and VM3 only
VM1 only
VM1, VM2 and VM3
Question 19 of 26
You have an Azure subscription that includes a virtual machine named VM1.
You need to protect VM1 by using Azure Backup.
Which Azure resource should you create first?
Select only one answer.
a backup policy
a backup vault
a recovery services vault I chose (bing)
a storage account
Question 20 of 26
You have an Azure subscription.
You plan to use fault domains.
From which Azure resource can you configure the fault domains?
Select only one answer.
Availability set I chose (bing)
Virtual machine
Virtual machine scale set (bing)
Virtual network
Question 23 of 26
You have an Azure subscription named Sub1.
You plan to deploy a virtual machine scale set named VMSS1 in East US region. VMSS1 will have 8 instances.
What is the maximum number of availability zones that VMSS1 can use?
Select only one answer.
1
2
3 I chose (bing)
4
Question 25 of 26
Your company has multiple departments and one Azure subscription. The user accounts for all employees are in the same Microsoft Entra tenant.
You need to delegate permissions for the users in a single department only.
What should you use to organize the user accounts?
Linux file system used to resemble an unorganized town where individuals constructed their houses wherever they pleased. However, in 1994, the Filesystem Hierarchy Standard (FHS) was introduced to bring order to the Linux file system.
Back in 1996 I learned how to install software on my spanking new Linux before really understanding the topography of the filesystem. This turned out to be a problem, not so much for programs, because they would just magically work even though I hadn’t a clue of where the actual executable files landed. The problem was the documentation.
You see, back then, Linux was not the intuitive, user-friendly system it is today. You had to read a lot. You had to know things about the frequency rate of your CRT monitor and the ins and outs of your noisy dial-up modem, among hundreds of other things. I soon realized I would need to spend some time getting a handle on how the directories were organized and what all their exotic names like /etc (not for miscellaneous files), /usr (not for user files), and /bin (not a trash can) meant.
This tutorial will help you get up to speed faster than I did.
Structure
It makes sense to explore the Linux filesystem from a terminal window, not because the author is a grumpy old man and resents new kids and their pretty graphical tools — although there is some truth to that — but because a terminal, despite being text-only, has better tools to show the map of Linux’s directory tree.
In fact, that is the name of the first tool you’ll install to help you on the way: tree. If you are using Ubuntu or Debian, you can do:sudo apt install tree
On Red Hat or Fedora, do:sudo dnf install tree
For SUSE/openSUSE use zypper:sudo zypper install tree
For Arch-like distros (Manjaro, Antergos, etc.) use:sudo pacman -S tree
… and so on.
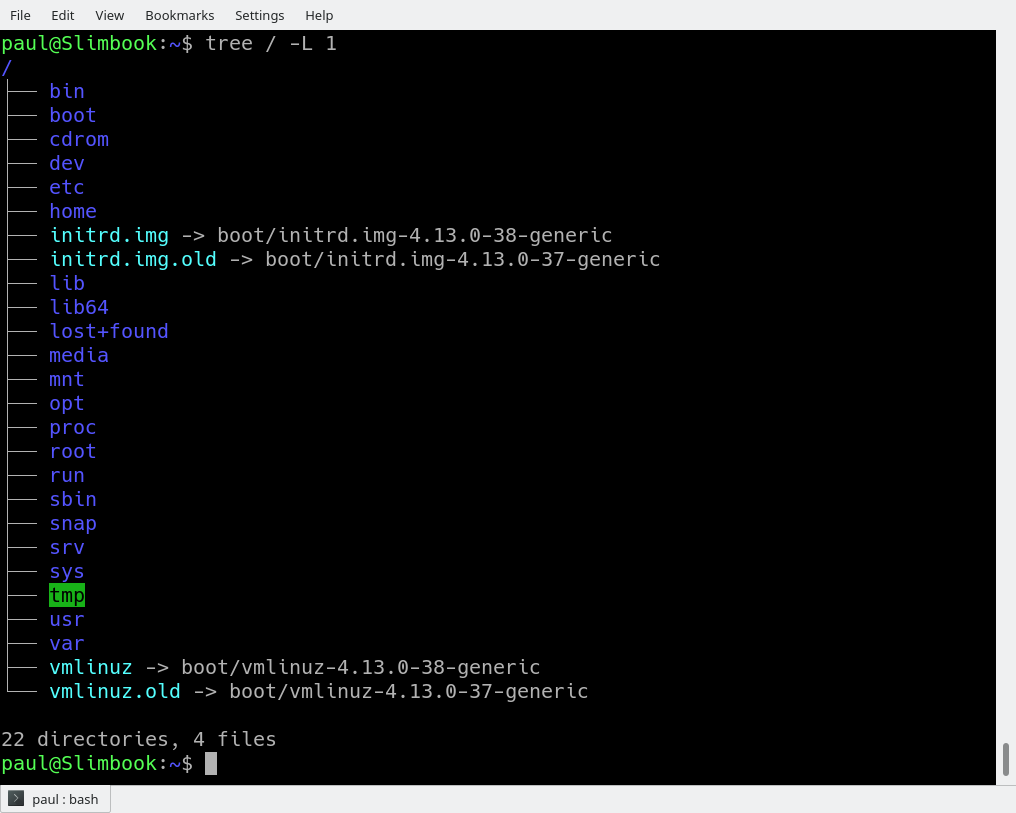
Once installed, stay in your terminal window and run tree like this:tree /
The / in the instruction above refers to the root directory. The root directory is the one from which all other directories branch off from. When you run tree and tell it to start with /, you will see the whole directory tree, all directories and all the subdirectories in the whole system, with all their files, fly by.
If you have been using your system for some time, this may take a while, because, even if you haven’t generated many files yourself, a Linux system and its apps are always logging, cacheing, and storing temporal files. The number of entries in the file system can grow quite quickly.
The instruction above can be translated as “show me only the 1st Level of the directory tree starting at / (root)“. The -Loption tells tree how many levels down you want to see.
Most Linux distributions will show you the same or a very similar layout to what you can see in the image above. This means that even if you feel confused now, master this, and you will have a handle on most, if not all, Linux installations in the whole wide world.
To get you started on the road to mastery, let’s look at what each directory is used for. While we go through each, you can peek at their contents using ls.
Directories
From top to bottom, the directories you are seeing are as follows.
/bin
/bin is the directory that contains binaries, that is, some of the applications and programs you can run. You will find the ls program mentioned above in this directory, as well as other basic tools for making and removing files and directories, moving them around, and so on. There are more bin directories in other parts of the file system tree, but we’ll be talking about those in a minute.
/boot
The /boot directory contains files required for starting your system. Do I have to say this? Okay, I’ll say it: DO NOT TOUCH!. If you mess up one of the files in here, you may not be able to run your Linux and it is a pain to repair. On the other hand, don’t worry too much about destroying your system by accident: you have to have superuser privileges to do that.
/dev
/dev contains device files. Many of these are generated at boot time or even on the fly. For example, if you plug in a new webcam or a USB pendrive into your machine, a new device entry will automagically pop up here.
/etc
/etc is the directory where names start to get confusing. /etc gets its name from the earliest Unixes and it was literally “et cetera” because it was the dumping ground for system files administrators were not sure where else to put.
Nowadays, it would be more appropriate to say that etc stands for “Everything to configure,” as it contains most, if not all system-wide configuration files. For example, the files that contain the name of your system, the users and their passwords, the names of machines on your network and when and where the partitions on your hard disks should be mounted are all in here. Again, if you are new to Linux, it may be best if you don’t touch too much in here until you have a better understanding of how things work.
/home
/home is where you will find your users’ personal directories. In my case, under /home there are two directories: /home/paul, which contains all my stuff; and /home/guest, in case anybody needs to borrow my computer.
/lib
/lib is where libraries live. Libraries are files containing code that your applications can use. They contain snippets of code that applications use to draw windows on your desktop, control peripherals, or send files to your hard disk.
There are more lib directories scattered around the file system, but this one, the one hanging directly off of / is special in that, among other things, it contains the all-important kernel modules. The kernel modules are drivers that make things like your video card, sound card, WiFi, printer, and so on, work.
/media
The /media directory is where external storage will be automatically mounted when you plug it in and try to access it. As opposed to most of the other items on this list, /media does not hail back to 1970s, mainly because inserting and detecting storage (pendrives, USB hard disks, SD cards, external SSDs, etc) on the fly, while a computer is running, is a relatively new thing.
/mnt
The /mnt directory, however, is a bit of remnant from days gone by. This is where you would manually mount storage devices or partitions. It is not used very often nowadays.
/opt
The /opt directory is often where software you compile (that is, you build yourself from source code and do not install from your distribution repositories) sometimes lands. Applications will end up in the /opt/bin directory and libraries in the /opt/lib directory.
A slight digression: another place where applications and libraries end up in is /usr/local, When software gets installed here, there will also be /usr/local/bin and /usr/local/lib directories. What determines which software goes where is how the developers have configured the files that control the compilation and installation process.
/proc
/proc, like /dev is a virtual directory. It contains information about your computer, such as information about your CPU and the kernel your Linux system is running. As with /dev, the files and directories are generated when your computer starts, or on the fly, as your system is running and things change.
/root
/root is the home directory of the superuser (also known as the “Administrator”) of the system. It is separate from the rest of the users’ home directories BECAUSE YOU ARE NOT MEANT TO TOUCH IT. Keep your own stuff in your own directories, people.
/run
/run is another new directory. System processes use it to store temporary data for their own nefarious reasons. This is another one of those DO NOT TOUCH folders.
/sbin
/sbin is similar to /bin, but it contains applications that only the superuser (hence the initial s) will need. You can use these applications with the sudo command that temporarily concedes you superuser powers on many distributions. /sbin typically contains tools that can install stuff, delete stuff and format stuff. As you can imagine, some of these instructions are lethal if you use them improperly, so handle with care.
/usr
The /usr directory was where users’ home directories were originally kept back in the early days of UNIX. However, now /home is where users kept their stuff as we saw above. These days, /usr contains a mish-mash of directories which in turn contain applications, libraries, documentation, wallpapers, icons and a long list of other stuff that need to be shared by applications and services.
You will also find bin, sbin and lib directories in /usr. What is the difference with their root-hanging cousins? Not much nowadays. Originally, the /bin directory (hanging off of root) would contain very basic commands, like ls, mv and rm; the kind of commands that would come pre-installed in all UNIX/Linux installations, the bare minimum to run and maintain a system. /usr/bin on the other hand would contain stuff the users would install and run to use the system as a work station, things like word processors, web browsers, and other apps.
But many modern Linux distributions just put everything into /usr/bin and have /bin point to /usr/bin just in case erasing it completely would break something. So, while Debian, Ubuntu and Mint still keep /bin and /usr/bin (and /sbin and /usr/sbin) separate; others, like Arch and its derivatives just have one “real” directory for binaries, /usr/bin, and the rest or *bins are “fake” directories that point to /usr/bin.
/srv
The /srv directory contains data for servers. If you are running a web server from your Linux box, your HTML files for your sites would go into /srv/http (or /srv/www). If you were running an FTP server, your files would go into /srv/ftp.
/sys
/sys is another virtual directory like /proc and /dev and also contains information from devices connected to your computer.
In some cases you can also manipulate those devices. I can, for example, change the brightness of the screen of my laptop by modifying the value stored in the /sys/devices/pci0000:00/0000:00:02.0/drm/card1/card1-eDP-1/intel_backlight/brightness file (on your machine you will probably have a different file). But to do that you have to become superuser. The reason for that is, as with so many other virtual directories, messing with the contents and files in /sys can be dangerous and you can trash your system. DO NOT TOUCH until you are sure you know what you are doing.
/tmp
/tmp contains temporary files, usually placed there by applications that you are running. The files and directories often (not always) contain data that an application doesn’t need right now, but may need later on.
You can also use /tmp to store your own temporary files — /tmp is one of the few directories hanging off / that you can actually interact with without becoming superuser.
/var
/var was originally given its name because its contents was deemed variable, in that it changed frequently. Today it is a bit of a misnomer because there are many other directories that also contain data that changes frequently, especially the virtual directories we saw above.
Be that as it may, /var contains things like logs in the /var/log subdirectories. Logs are files that register events that happen on the system. If something fails in the kernel, it will be logged in a file in /var/log; if someone tries to break into your computer from outside, your firewall will also log the attempt here. It also contains spools for tasks. These “tasks” can be the jobs you send to a shared printer when you have to wait because another user is printing a long document, or mail that is waiting to be delivered to users on the system.
Your system may have some more directories we haven’t mentioned above. In the screenshot, for example, there is a /snap directory. That’s because the shot was captured on an Ubuntu system. Ubuntu has recently incorporated snap packages as a way of distributing software. The /snap directory contains all the files and the software installed from snaps.
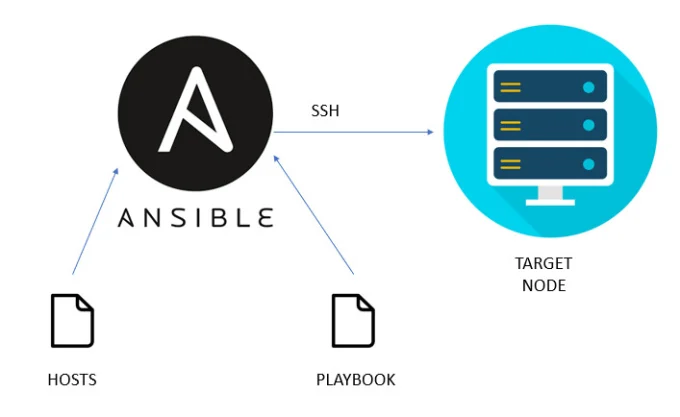
Introduction Ansible is a very powerful open-source IT automation tool. It is known as a configuration management tool. Ansible is written in Python language, so it requires Python to be available on the machine. We can use Ansible to automate software installation, software configuration, configuration management, etc.
To get a quick high-level understanding of Ansible, please review the article below.
To use Ansible for your automation purpose you would need a machine where Ansible needs to be installed and this is called ansible-host or ansible-controller. And you would need other machines (remote or target machines) where Ansible will perform the tasks.
There are multiple ways to install Ansible in RHEL. Below are the two most used methods.
Ansible installation using RHEL package manager. Ansible installation using the pip module of Python. In this article, we will see how to install Ansible using the RHEL package manager in a step-by-step manner.
thinking
Prerequisite
Since we will install Ansible on RHEL (Red Hat Enterprise Linux), you must have an RHEL machine connected to the Red Hat subscription manager.
On the RHEL machine, you would need a user which has sudo privileges.
Steps/Commands to install Ansible
As of April 2023, the latest version of Ansible is 2.13.x (ansible core). We will be installing the same.
We will be using dnf to install Ansible. (dnf is the package management utility for RHEL, Fedora, and Centos).
Step 1: Update OS
# Run the below command to update the RHEL OS.
sudo dnf update -y
Step 2: Install Python
# Check whether Python is installed or not. RHEL 8 comes with python3. So, we don’t need to install Python.python3 -V
# If Python is not installed, then run the below command to install it.
sudo dnf install python3
Step 3: Enable repos for Ansible
# List the available repos that include ansible-core packages
sudo dnf list ansible-core
OR
sudo dnf info ansible-core
In the output of the above, we will see the repo name. We need to enable that repo.
# Enable the repo that includes the ansible-core package.
Red Hat Enterprise Linux (RHEL) 9.3 is a major release of the enterprise Linux operating system from Red Hat, which was released on November 8, 2023 and comes with a number of new features and enhancements.
RHEL 9.3 is a third release in the Red Hat family since the acquisition of Red Hat by IBM in July 2019, and the third major version since the deprecation of the CentOS Project in favor of CentOS Stream which is now the upstream of RHEL.
RHEL 9.3 is the latest major version of RHEL and comes with Kernel 5.14 and a host of new software packages and tons of enhancements. It places an emphasis on security, stability, flexibility, and reliability.
Key Highlights of RHEL 9.3 At a glance, here are the major highlights of RHEL 9.3.
New Software Versions RHEL 9.3 ships with new versions of software including Python 3.11. Node.JS 18, GCC 12, Perl 5.36, Ruby 3.1, PHP 8.2, and many more.
How to Download RHEL 9.3 for Free
The Red Hat Developer Subscription is a no-cost offering of the Red Hat Developer program that is tailored for individual developers who want to reap the full benefits of Red Hat Enterprise Linux.
It gives developers access to all versions of Red Hat Enterprise Linux among other Red Hat products such as add-ons, software updates, and security errata.
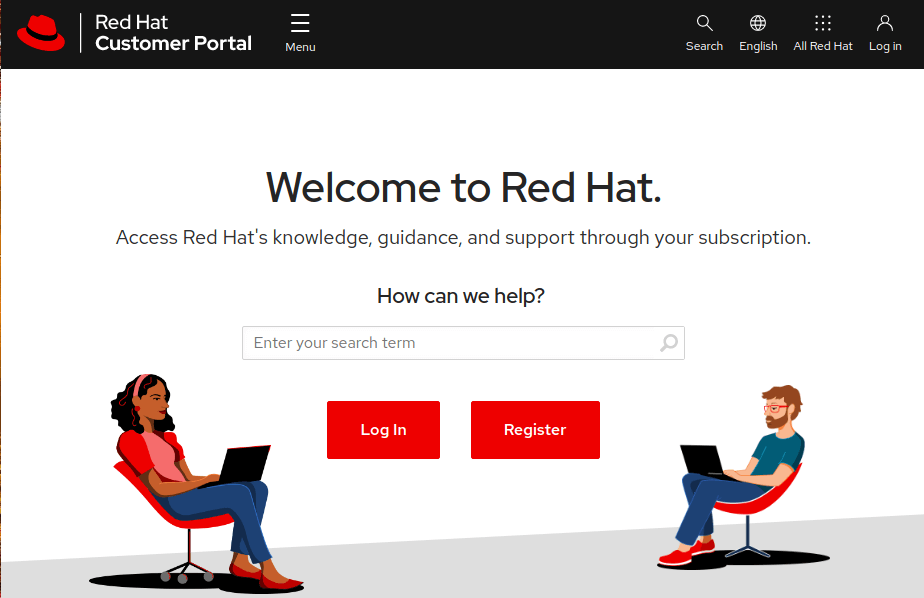
Before anything else, make sure that you have an active Red Hat account. If you don’t have an account yet, navigate to the Red Hat Customer Portal and click on the ‘Register’ button and fill in your details to create a Red Hat account.
Create RedHat Account
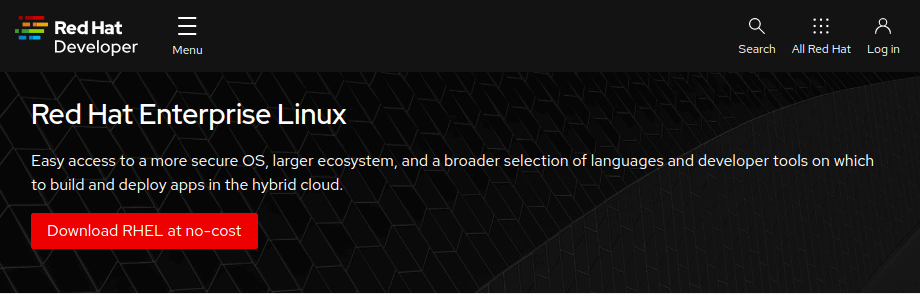
Once you have created a Red Hat account, you are all set to start downloading RHEL 9.3. To download Red Hat Enterprise Linux 9.3 at absolutely no cost, head over to the Red Hat Developer Portal and sign in using your account credentials.
Next, navigate to the RHEL 9.3 download page and click on the download button shown below.
Download RHEL 9 for Free
Shortly after, the download of the RHEL 9.3 ISO image will begin. You should see a confirmation message informing you that the download of the RHEL 9 is underway.
RHEL 9 Download
The download size of the ISO image is about 8GB. As such, ensure that you have a high-speed internet connection for a faster download.
With your bootable medium at hand, plug it into the PC that you wish to install RHEL 9.3 on and reboot the system. Remember to configure the BIOS to have the bootable medium first in the boot priority so that the system boots into the medium first.
Also, ensure that you have a high-speed internet connection that will come in handy during the installation.
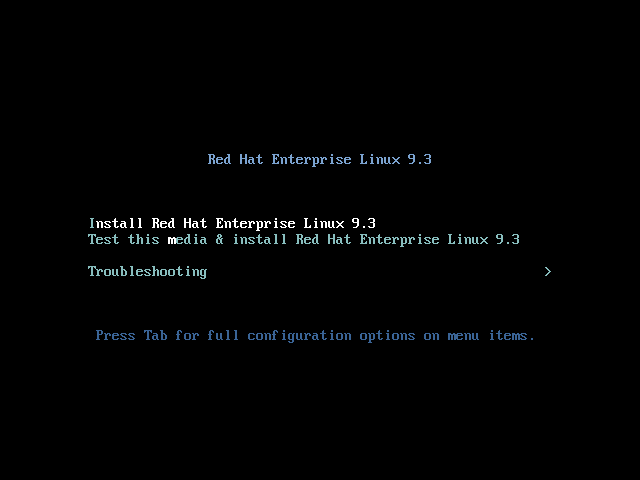
Step 1: Start RHEL 9 Installation
When the system reboots, you will get a black screen with the following options. To begin the installation, press ENTER on the first option ‘Install Red Hat Enterprise Linux 9.3’.
RHEL 9.3 Boot Menu
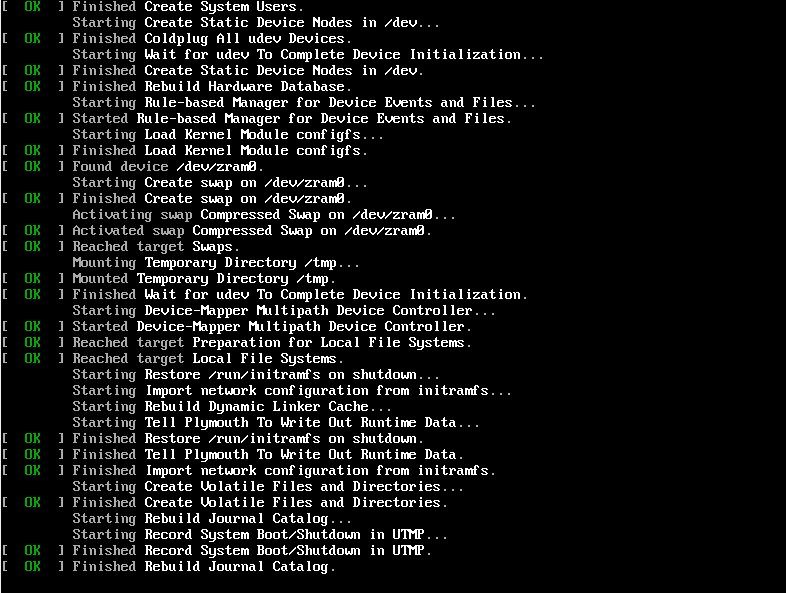
Shortly afterward, the following boot messages will be splashed on the screen. No action will be required so, just patiently wait as the installer gets ready to install RHEL.
RHEL 9 Booting
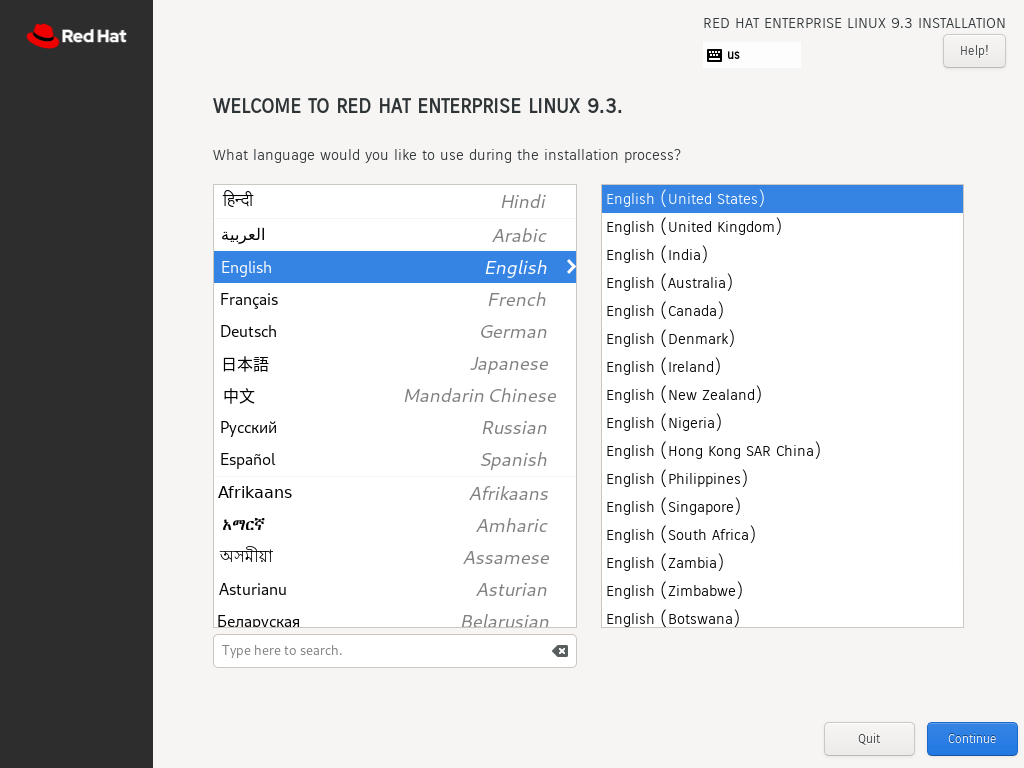
After a few seconds, the graphical wizard for installing Red Hat Enterprise Linux 9.3. In the first step, select your preferred language and click ‘Continue’.
RHEL 9 Language
Step 2: Configure Partitioning
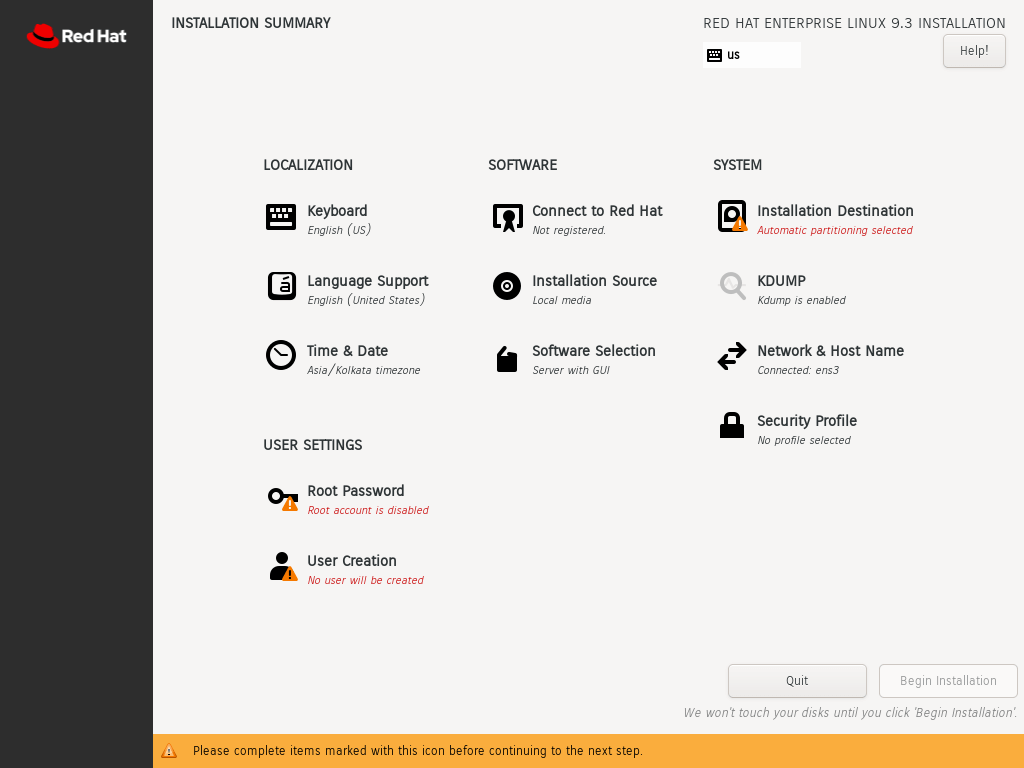
The next step presents you with an installation summary that is segmented into four sections:
LOCALIZATION
SOFTWARE
SYSTEM
USER SETTINGS
We will only focus on three items that are mandatory before proceeding with the installation – Installation Destination, Root Account, and Regular Account creation.
RHEL Installation Summary
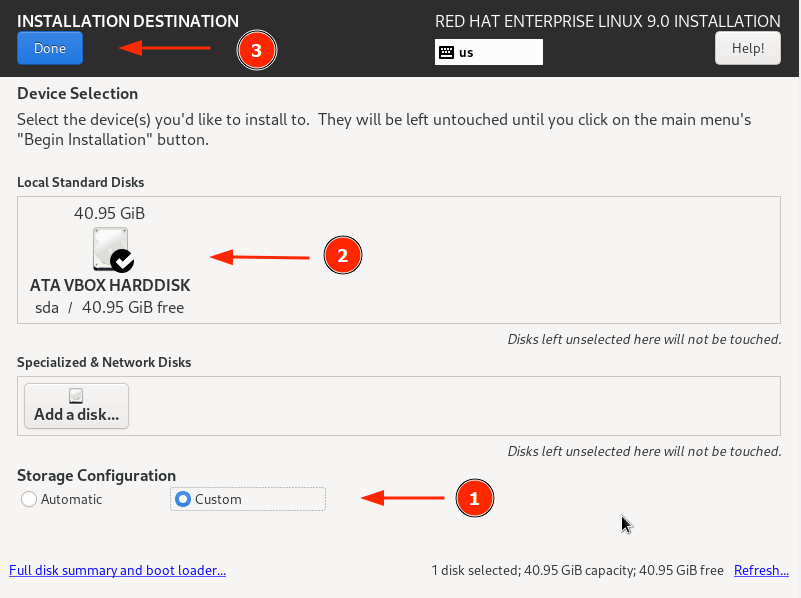
To set up partitioning, click on ‘Installation Destination’ under SYSTEM. On the ‘Installation Destination’ page, ensure that you have selected the ‘Automatic’ option if you wish the wizard to automatically partition the hard drive. Otherwise, select ‘Custom’ to manually create the partitions.
In addition, ensure that you have selected the hard disk on your PC. Then click ‘Done’.
RHEL 9 Install Drive
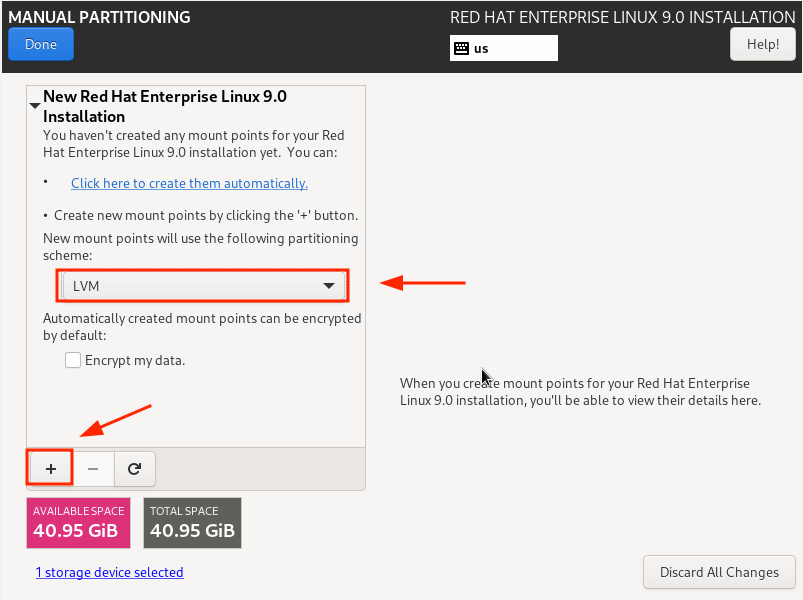
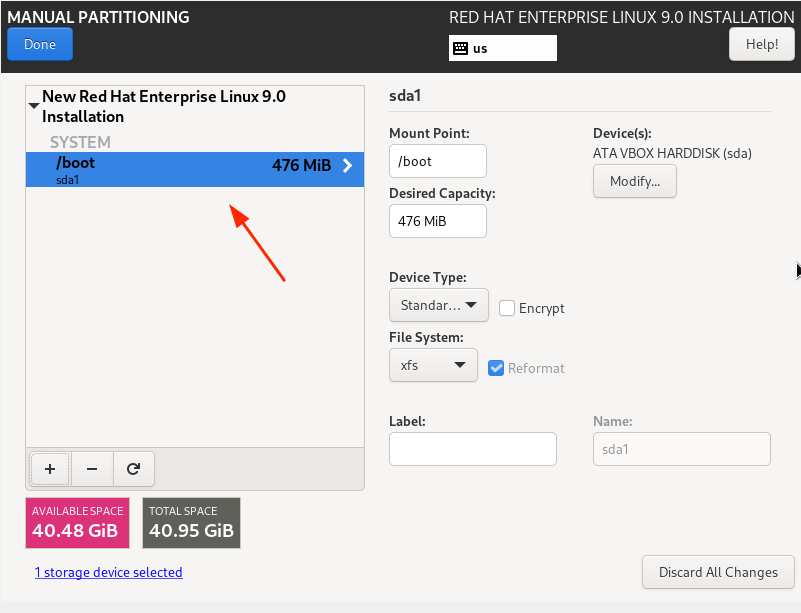
This takes you to the ‘Manual Partitioning’ window. By default, the LVM partitioning scheme is selected, which is just fine.
To start creating the partitions, click on the plus [ + ] sign.
RHEL 9 Manual Partitioning
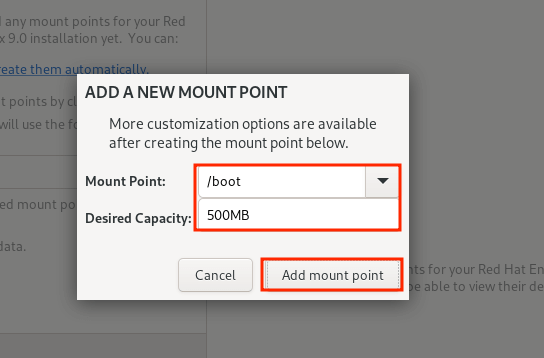
For demonstration purposes, we will create the following partitions./boot – 500MB /home – 20GB /root – 15GB swap – 8GB
First, we will specify the boot option.
Create Boot Partition
From the partition table below, you can see that the boot partition has been created.
RHEL 9 Boot Partition
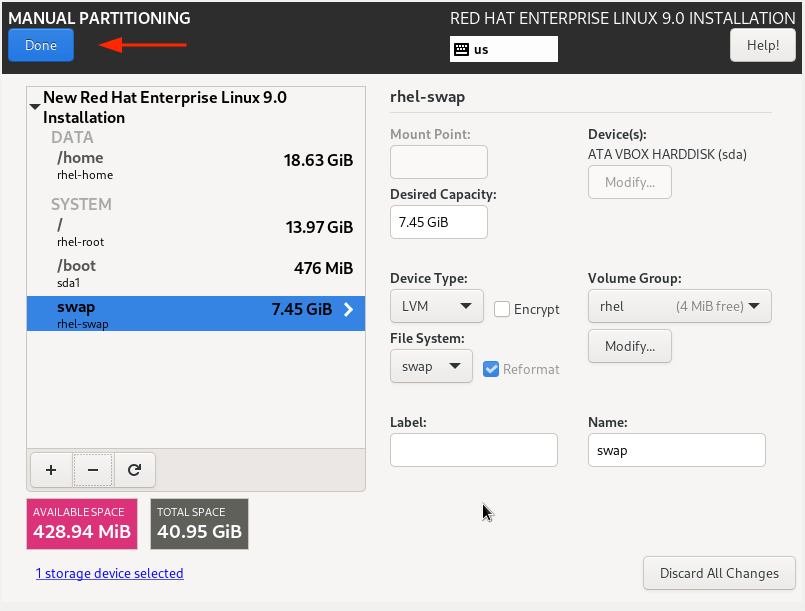
Repeat the same steps and create the /home, /root, and swap mount points.
Our complete partition table is shown below. To save the changes, click on ‘Done’.
RHEL 9 Partition Table
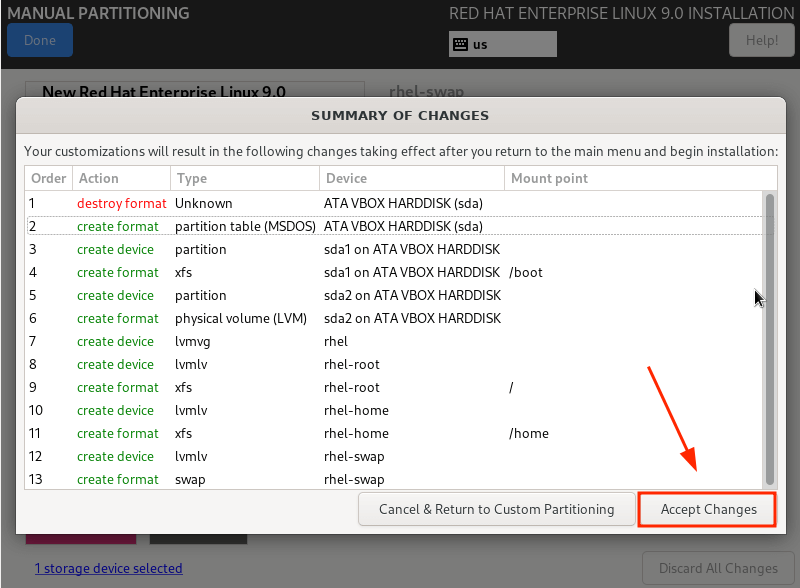
Then click ‘Accept Changes’ on the pop-up that appears.
RHEL 9 Disk Changes
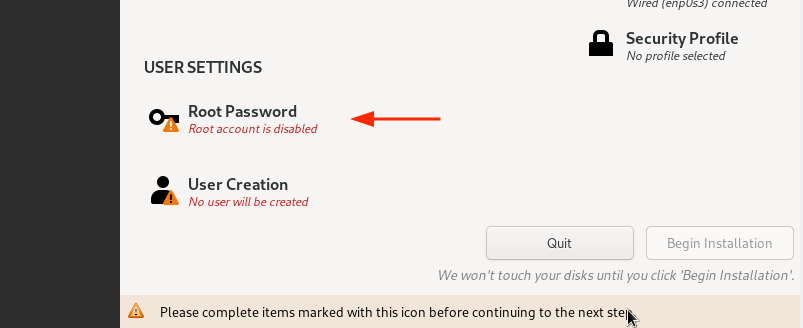
Step 3: Configure User Settings
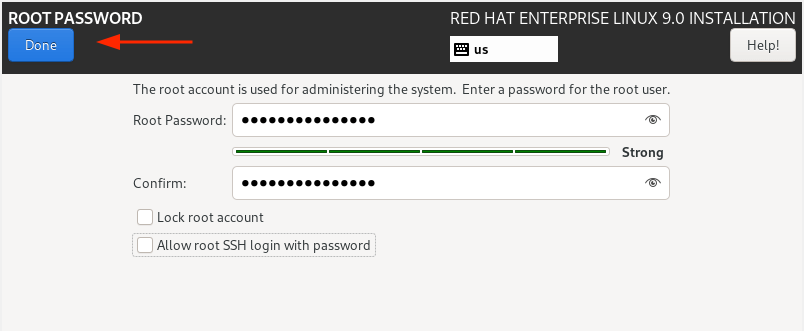
Next, we are going to configure user settings, starting off with the Root password. So, click on the ‘Root Password’ icon.
RHEL 9 Root Password
Unlock the Root account by providing a root password and confirming it. Then click ‘Done’.
Create Root Password
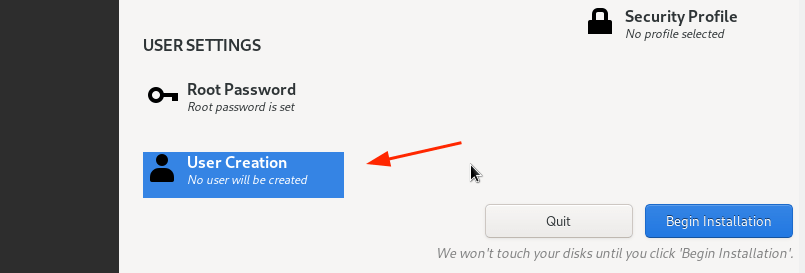
Next, create a regular login user by clicking on ‘User creation’.
RHEL 9 User Creation
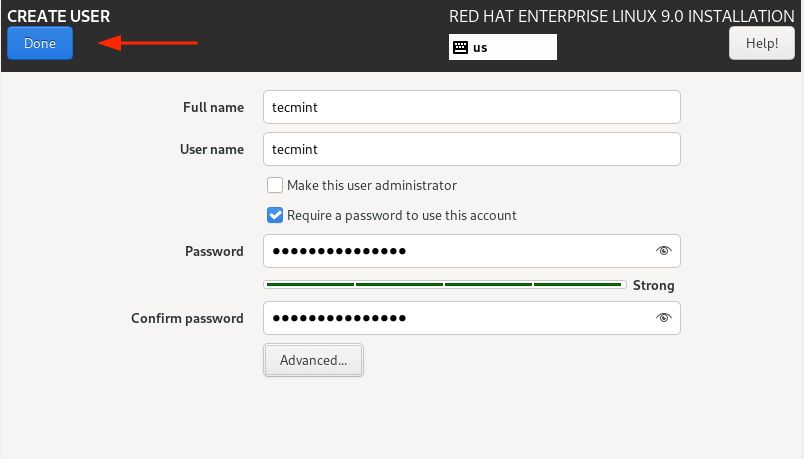
Provide the username and password details of the user and click ‘Done’.
Create User Account
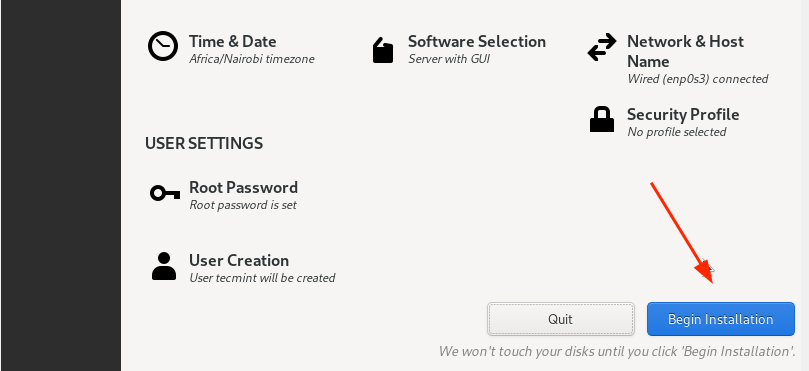
We are now all set to proceed with the installation. So, click on ‘Begin Installation’.
RHEL 9 Begin Installation
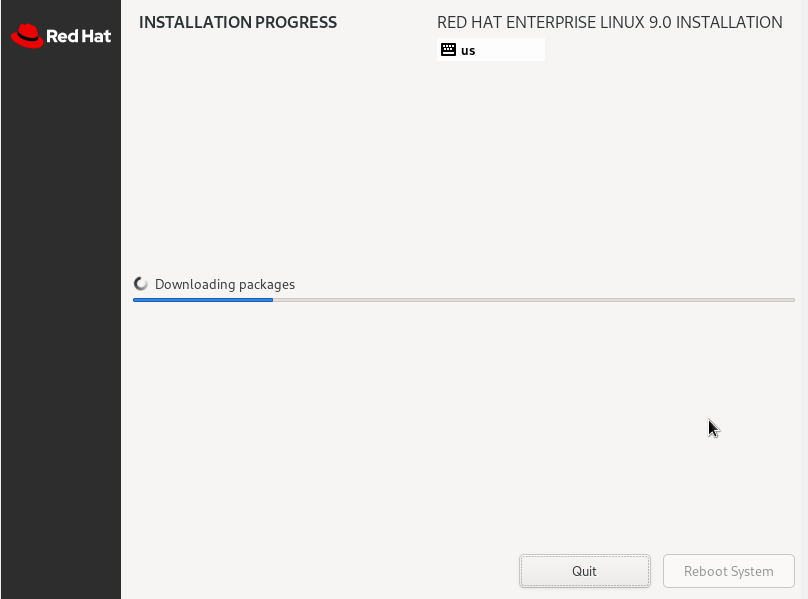
The Wizard will download all the required packages from the RedHat ISO image and save them to the hard drive. This is a process that takes quite a bit of time, and this is an ideal moment to take a break as the installation progresses.
RHEL 9 Installation
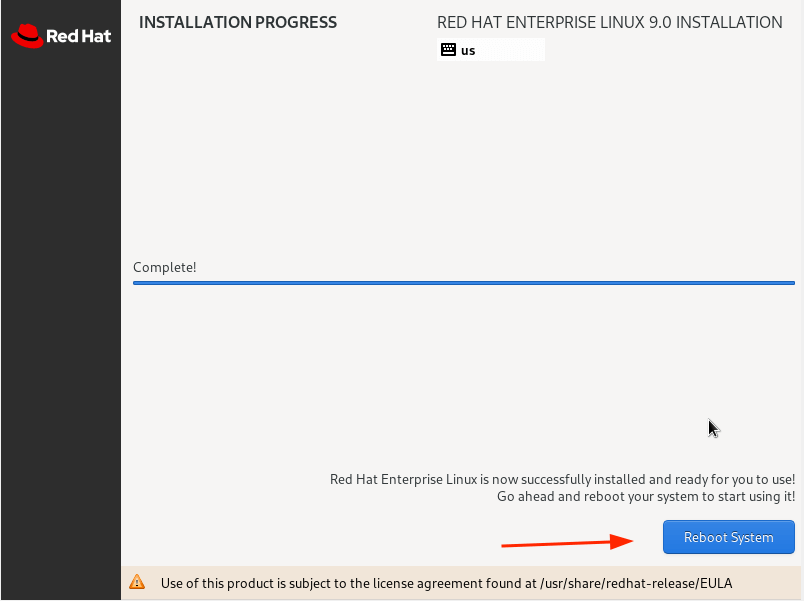
Once the installation is complete, you will be required to reboot your system so that you can log in to your fresh RHEL 9 installation.
So, click the ‘Reboot System’ button.
RHEL 9 Installation Finishes
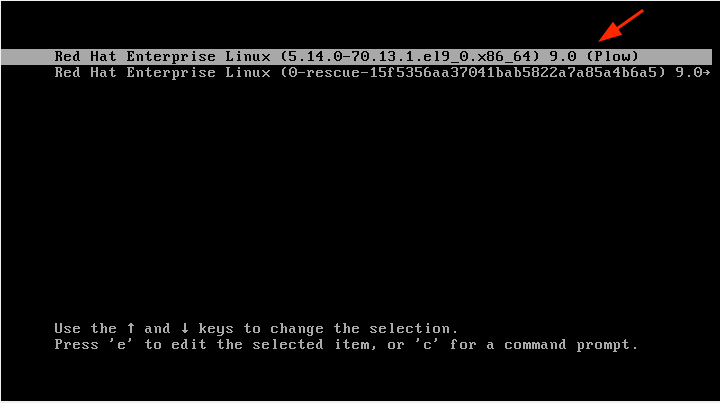
Step 4: Boot Into Red Hat Enterprise Linux 9
Once the system reboots, select the first entry on the GRUB menu that points to Red Hat Enterprise Linux 9.0.
RHEL 9 Boot Menu
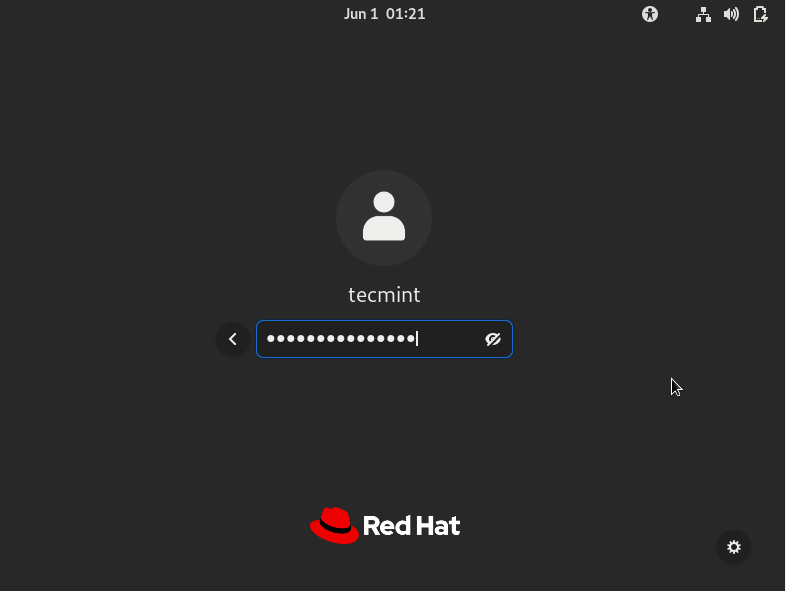
Shortly afterward, provide your password on the login screen and press ENTER.
RHEL 9 Login
Once logged in, you can opt to take a tour of the freshly installed RHEL 9 or decline and go straight to the Desktop.
RHEL 9 Tour
Finally, you will see the GNOME 42 desktop environment which has received a facelift and looks quite elegant.
Cisco ACI is an enterprise-class, software-defined networking (SDN) solution that provides complete control of the data center network. Using a policy-based approach, Cisco ACI delivers security, performance, and scalability for today’s demanding applications.
Cisco ACI is part of the broader Cisco SDN portfolio, which also includes Nexus switches and Application Centric Infrastructure (ACI) controllers. If you are looking for a way to improve your data center network, Cisco ACI may be the answer. In this article, you can find out more about Cisco ACI, including how it works, its benefits, and what it is used for.
What Is Cisco ACI?
Cisco ACI is a software-defined networking (SDN) technology offering from Cisco that allows for centralized application policy enforcement across a data center network. It is designed to simplify and automate the creation, management, and enforcement of network security policies.
ACI provides uniform policy definition and application across physical and virtual resources, as well as bare-metal server deployments. This can be done through an easy-to-use graphical user interface or programmatically through APIs. The latter option makes it possible to integrate ACI into your existing DevOps processes.
With Cisco ACI, you can apply consistent security policies across your data center regardless of the underlying infrastructure. The result is increased agility and reduced operational costs. In addition, ACI provides built-in micro-segmentation capabilities that can help you improve your data center security posture.
Cisco ACI is based on the concept of an application profile. An application profile defines the set of network and security policies that should be applied to a particular application or workload. Application profiles are created using the Cisco Application Policy Infrastructure Controller (APIC).
The APIC is a centralized management system that gives you visibility into and control over the network resources in your data center. It also provides policy enforcement and orchestration capabilities. The APIC communicates with the network devices in your data center through an out-of-band management network.
Cisco ACI uses a leaf-spine architecture. The leaf nodes are Top-of-Rack (ToR) switches that connect to server endpoints. The spine nodes are core switches that connect the leaf nodes to each other.
Cisco ACI supports both physical and virtualized leaf nodes. Physical leaves can be either Cisco Nexus 9000 Series Switches or Cisco ASA 1000V Cloud Firewalls. Virtualized leaves are provided by the Cisco Avi Vantage platform.
What Is an SDN?
SDN stands for software-defined networking. It’s a network architecture that uses programmable interfaces to enable more flexible and dynamic network control.
In traditional networks, the control plane is physically separate from the data plane. This means that the traffic flow is dictated by the hardware, which can be inflexible and difficult to change. In an SDN, the control plane is implemented in software, giving it more flexibility.
This separation of duties can make it easier to manage complex networks, because you can change the configuration of the network without having to physically reconfigure the devices. It also makes it possible to dynamically adjust traffic flow according to changing needs.
SDN controllers use protocols like OpenFlow to communicate with devices in the network. Using these protocols allows SDN to centrally control the flow of traffic, making it possible to implement policies that can optimize performance or reduce costs.
SDN is still a relatively new technology, and there are a number of different approaches to implementing it. But the basic idea is to use software to make networks more flexible and easier to manage.
How Does ACI Work?
In the most basic sense, ACI (Application Centric Infrastructure) is a data center network architecture that enables applications to be deployed and managed in a more flexible and efficient manner. ACI provides a single point of control for both physical and virtual networks, allowing for greater transparency and easier management of complex application environments.
ACI is designed to increase agility and efficiency in the data center by automating many of the tasks that have traditionally been manual or error-prone. For example, ACI can automatically provision new applications on the infrastructure, identify and correct errors in application configurations, and dynamically adapt network resources to changing application needs. By simplifying these tasks, ACI can help reduce deployment times and improve overall efficiency in the data center.
In addition to increasing agility and efficiency, ACI also provides improved security and compliance capabilities. ACI includes features such as built-in firewalls and intrusion detection/prevention systems, which can help protect data center assets from malicious attacks. ACI also provides granular visibility into application traffic, allowing administrators to quickly identify and respond to potential security threats.
Overall, ACI is a data center network architecture that enables applications to be deployed and managed in a more flexible and efficient manner. ACI can help improve agility, efficiency, security, and compliance in the data center.
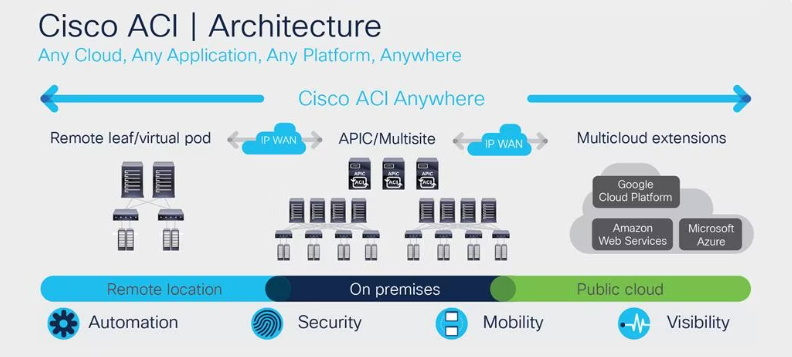
Cisco ACI Architecture
Cisco ACI is an application-centric infrastructure that enables you to build your data center network around the needs of your applications. ACI uses a centralized policy model to automate and simplify network configuration, deployment, and management. This architecture decouples the network control plane from the data forwarding plane, allowing for greater flexibility, scalability, and manageability.
ACI consists of three key components: the Application Policy Infrastructure Controller (APIC), the leaf switches, and the spine switches. The APIC is a centralized controller that manages all aspects of the ACI fabric. The leaf switches are ToR switches that provide connectivity between servers and external networks. The spine switches are aggregate Layer 3 switches that provide high-bandwidth connectivity between leaf switches.
The APIC provides a single point of control and management for the entire ACI fabric. It uses an open, standards-based application programming interface (API) to expose the ACI policy model to external applications and orchestration tools. The APIC also provides an intuitive web-based user interface (UI) for manual configuration and monitoring of the ACI fabric.
The leaf switches are ToR switches that provide connectivity between servers and external networks. Leaf switches are fully programmable and support all Layer 2 and Layer 3 protocols. In addition, leaf switches also support quality of service (QoS), security features, and virtualization capabilities.
The spine switches are aggregate Layer 3 switches that provide high-bandwidth connectivity between leaf switches. Spine switches are also fully programmable and support all Layer 2 and Layer 3 protocols.
Why Is Cisco ACI Important? Cisco ACI Benefits
Cisco ACI is a software-defined networking (SDN) technology that enables virtualization of the network infrastructure. Cisco ACI offers a number of benefits, including improved agility, reduced complexity, and enhanced security.
Improved agility: Cisco ACI enables rapid provisioning of new applications and services by automating the creation and enforcement of network policies. This reduces the need for manual configuration of network devices and speeds up the process of adding new services and applications.
Reduced complexity: Cisco ACI simplifies network management by consolidating multiple disparate networks into a single logical network. This reduces the number of devices that need to be managed and monitored, and makes it easier to troubleshoot problems. In addition, Cisco ACI provides a central point of control for managing the network, which reduces the need for costly and error-prone manual configuration.
Enhanced security: Cisco ACI includes built-in security features that help protect the network from attack. These features include role-based access control, which limits users to only those resources they are authorized to access, and intrusion detection and prevention, which can detect and block malicious traffic. In addition, Cisco ACI uses encryption to protect data in transit, ensuring that only authorized users can view or modify it.
Increased efficiency: Cisco ACI automates many common network management tasks, such as provisioning new devices, configuring port settings, and applying security policies. This reduces the need for manual intervention, saving time and money. In addition, Cisco ACI optimizes network utilization by automatically distributing traffic across multiple paths, ensuring that resources are used efficiently.
Greater scalability: Cisco ACI scales linearly, meaning that it can support a large number of devices and users without sacrificing performance. This makes it ideal for enterprise-wide deployments.
Cisco ACI provides numerous benefits that can help organizations improve their agility, reduce complexity, and enhance security. When considering an SDN solution, Cisco ACI should be high on the list of choices.
What Is Cisco ACI Used For?
Cisco ACI enables network administrators to centrally manage and orchestrate network resources through a graphical user interface (GUI). Cisco ACI can be used for a variety of purposes, including the following:
Infrastructure as a Service (IaaS): Cisco ACI can be used to provision and manage virtual machines (VMs), storage, and networking resources in an IaaS environment. This allows organizations to quickly provision and scale their IT infrastructure without having to purchase or deploy physical hardware.
Software-defined networking (SDN): Cisco ACI can be used to centrally manage and orchestrate network resources via a graphical user interface (GUI). This allows network administrators to easily provision and configure networking services, such as load balancing and traffic shaping.
Network security: Cisco ACI provides several features that can improve the security of your network, including role-based access control, application visibility and control, and encrypted data communications.
Cloud integration: Cisco ACI includes native support for popular cloud providers, such as Amazon Web Services (AWS), Microsoft Azure, and Google Cloud Platform (GCP). Organizations can then easily integrate their on-premises infrastructure with public cloud services.
How Cisco ACI Integrates With Other Products
Cisco ACI integrates with other products using a variety of methods to provide customers with the ability to create a best-of-breed solution.
The first method is through open APIs. Open APIs allow Cisco ACI to work with a wide range of software and hardware solutions from multiple vendors. This method gives customers the flexibility to choose the products that best meet their needs while still taking advantage of Cisco ACI’s industry-leading features and performance.
The second method is through jointly certified solutions. These are solutions that have been tested and certified by both Cisco and the partner company to work together seamlessly. This method gives customers peace of mind knowing that the products they are using have been designed to work together optimally.
The third method is through service chaining. Service chaining allows Cisco ACI to connect multiple services together in a predefined order. It thus becomes easy to create complex solutions that would otherwise be difficult to implement.
Cisco ACI provides customers with the ability to create a best-of-breed solution by integrating with other products using open APIs, jointly certified solutions, and service chaining. This advantage gives customers the flexibility to choose the products that best meet their needs while still taking advantage of Cisco ACI’s industry-leading features and performance.
With the release of Cisco ACI, the company is looking to solidify its position as a market leader in data center networking. While SDN has been around for a few years now, ACI represents a more holistic and comprehensive approach to SDN that takes into account all aspects of networking. So, ACI is an important tool for companies looking to move to the cloud or build out their data center infrastructure. If you’re curious about how Cisco ACI can benefit your business, reach out and we’ll be happy to discuss it with you.
Redhat full path tranining for Royal Saudi Air Defense Forces(الدفاع الجوي الملكي السعودي)
2023
There are many variations of passages of Lorem Ipsum available, but the majority have suffered alteration in some form, by injected humour, or randomised words which don’t look even slightly believable. If you are going to use a passage of Lorem Ipsum. You need to be sure there isn’t anything embarrassing hidden in the middle of text. All the Lorem Ipsum generators on the Internet tend toitrrepeat predefined chunks.
Course description
The first of two courses covering the core system administration tasks needed to manage Red Hat Enterprise Linux servers
Red Hat System Administration I (RH124) is designed for IT professionals without previous Linux system administration experience. The course provides students with Linux administration competence by focusing on core administration tasks. This course also provides a foundation for students who plan to become full-time Linux system administrators by introducing key command-line concepts and enterprise-level tools.
This course is the first of a two-course series that takes a computer professional without Linux system administration knowledge to become a fully capable Linux administrator. These concepts are further developed in the follow-on course, Red Hat System Administration II (RH134).
This course is based on Red Hat® Enterprise Linux 9.0.
Following course completion, you will receive a 45-day extended access to hands-on labs for any course that includes a virtual environment.Note: This course is offered as a five day in person class, a five day virtual class or is self-paced. Durations may vary based on the delivery. For full course details, scheduling, and pricing, select your location then “get started” on the right hand menu.
Course content summary
Introduce Linux and the Red Hat Enterprise Linux ecosystem.
Run commands and view shell environments.
Manage, organize, and secure files.
Manage users, groups and user security policies.
Control and monitor systemd services.
Configure remote access using the web console and SSH.
Configure network interfaces and settings.
Manage software using DNF
Audience for this course
The primary persona is a technical professional with current or pending responsibilities as a Linux enterprise or cloud system administrator.
This course is popular in Red Hat Academy, and is targeted at the student who is planning to become a technical professional using Linux.
Technology considerations
There are no special technical requirements for this course.
This course is not designed for bring your own device (BYOD).
Internet access is not required but is recommended so that students can research and browse Red Hat online resources.
Outline for this course Get started with Red Hat Enterprise Linux Describe and define open source, Linux, Linux distributions, and Red Hat Enterprise Linux Access the command line Log into a Linux system and run simple commands using the shell. Manage files from the command line Copy, move, create, delete, and organize files while working from the bash shell. Get help in Red Hat Enterprise Linux Resolve problems by using local help systems. Create, view, and edit text files Manage text files from command output or in a text editor. Manage local users and groups Create, manage, and delete local users and groups, as well as administer local password policies. Control access to files Set Linux file system permissions on files and interpret the security effects of different permission settings. Monitor and manage Linux processes Evaluate and control processes running on a Red Hat Enterprise Linux system. Control services and daemons Control and monitor network services and system daemons with the systemd service. Configure and secure SSH Configure secure command line service on remote systems, using OpenSSH. Analyze and store logs Locate and accurately interpret logs of system events for troubleshooting purposes. Manage networking Configure network interfaces and settings on Red Hat Enterprise Linux servers. Install and update software packages Download, install, update, and manage software packages from Red Hat and DNF package repositories. Access Linux files systems Access, inspect, and use existing file systems on storage attached to a Linux server. Analyze servers and get support Investigate and resolve issues in the web-based management interface, getting support from Red Hat to help solve problems. Comprehensive review Review the content covered in this course by completing hands-on exercises.
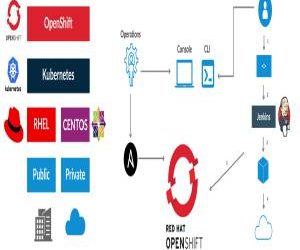
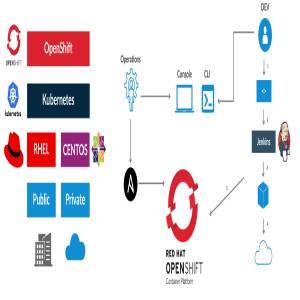
CDK 3: Build your first application using the OpenShift Console
The following steps will guide you through creating your first project on Red Hat OpenShift Container Platform, which is running inside the Red Hat Container Development Kit on the minishift virtual machine. The project is a Node.js “Hello, World” application that displays the current hit count. A MongoDB database is used to store the hit count. Two pods will be created, one for the Node.js application and another for the database.
The source code for the project is available on GitHub: openshift/nodejs-ex. The OpenShift catalog in CDK has a number of project templates available including this sample Node.js application. For this guide, we will use the template from the OpenShift catalog. You will use the OpenShift web console to build and manage your application.
Note: This guide uses the OpenShift web console to build and manage your application. Alternatively you could use the oc CLI to accomplish the same steps. The following command would create the application pulling the source from GitHub:$ oc new-app https://github.com/openshift/nodejs-ex
Once the VM is up and running, launch the web console in the browser:$ minishift console
Note: The web console may not launch on some older versions of Safari. You can get the URL to use with a different browser using the following command:$ minishift console –url
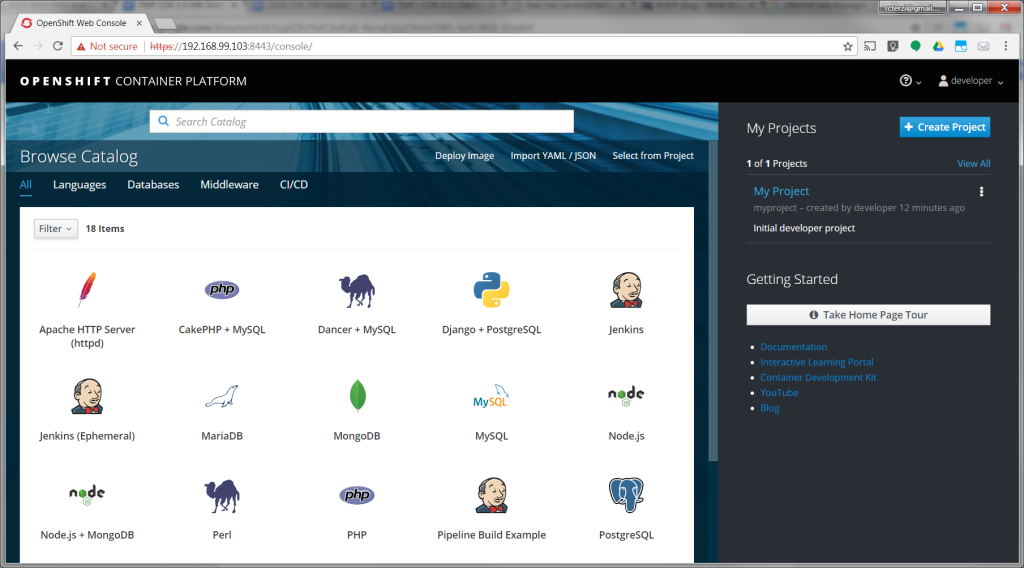
Log into the OpenShift console with developer as the username and any text for the password. A default empty project called My Project has been created for you. Alternatively, you can use the create project button to create a new empty project at any time.
Create the application
Follow these steps to create, build, and deploy the application:
After logging in you will see a page with the OpenShift catalog of application templates that have been preloaded into CDK.
Click on the icon labeled Node.js + MongoDB. Then, click Next to view the project configuration information.
None of the defaults need to be changed, so click Create to create the application. This will create the application and kick off a build. Click Close to dismiss the create dialog box.
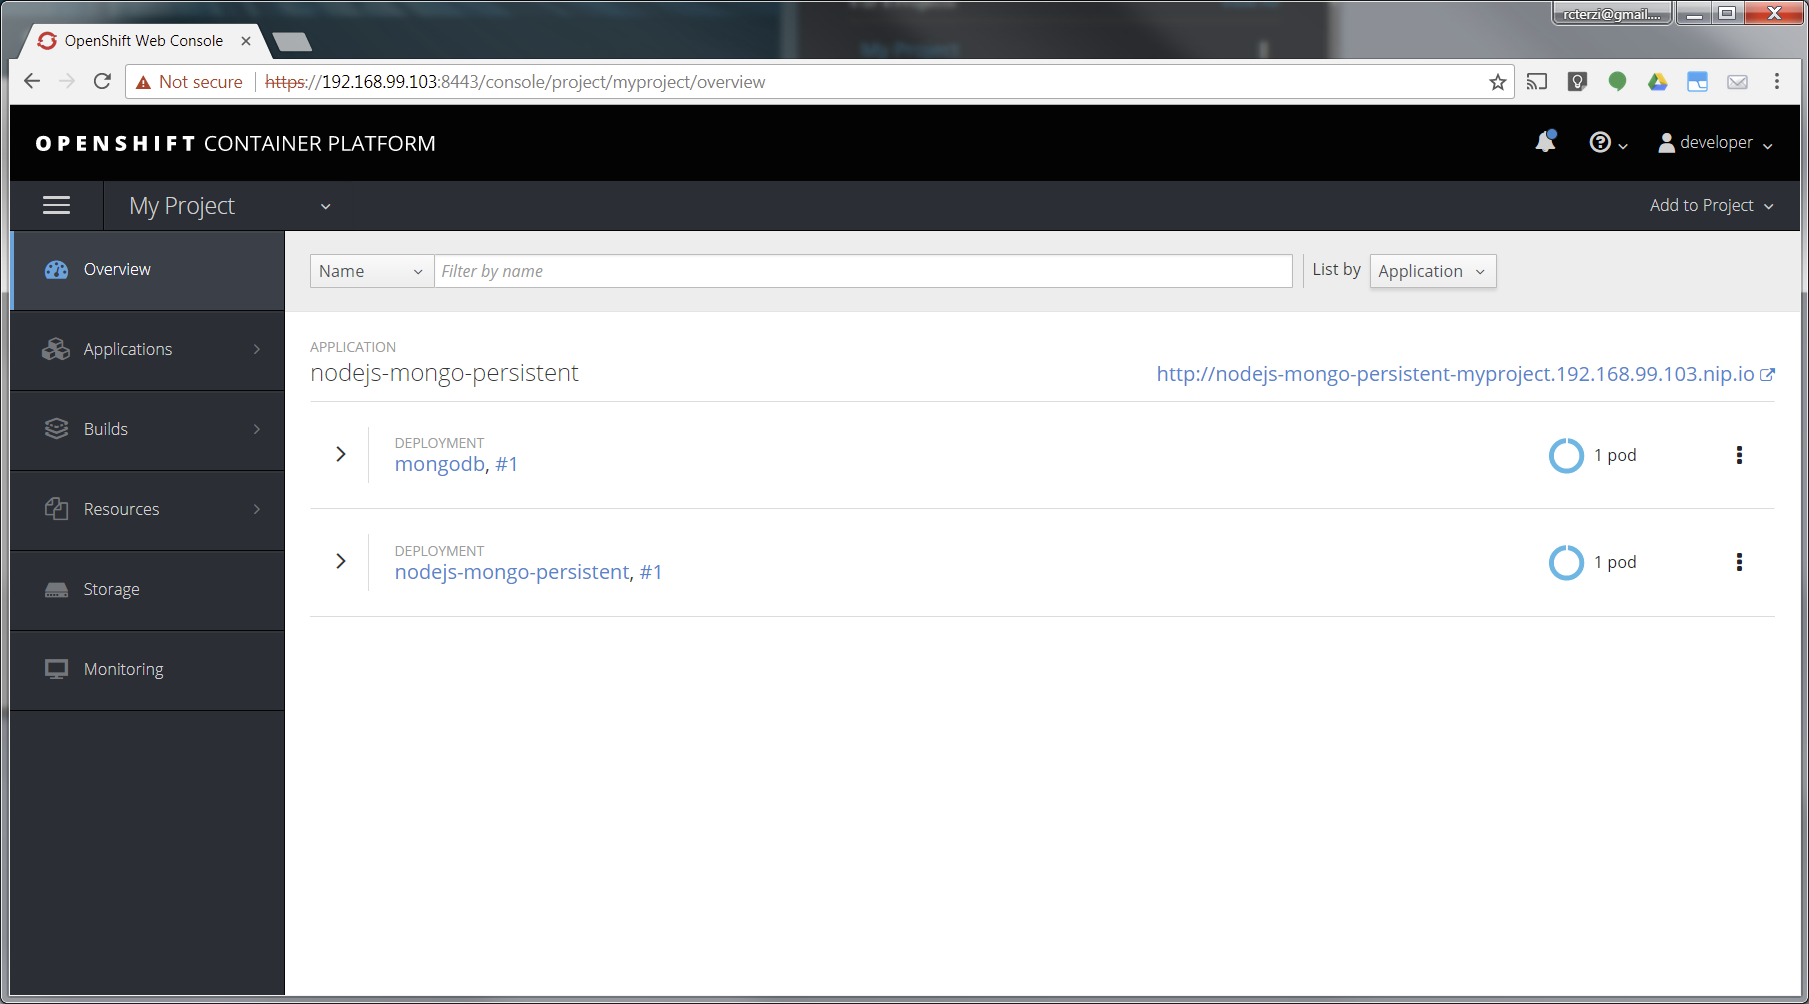
Go to your project overview page by clicking My Project from the list of projects on the right.
The application will be automatically built and deployed. You might need to wait for the build to finish.
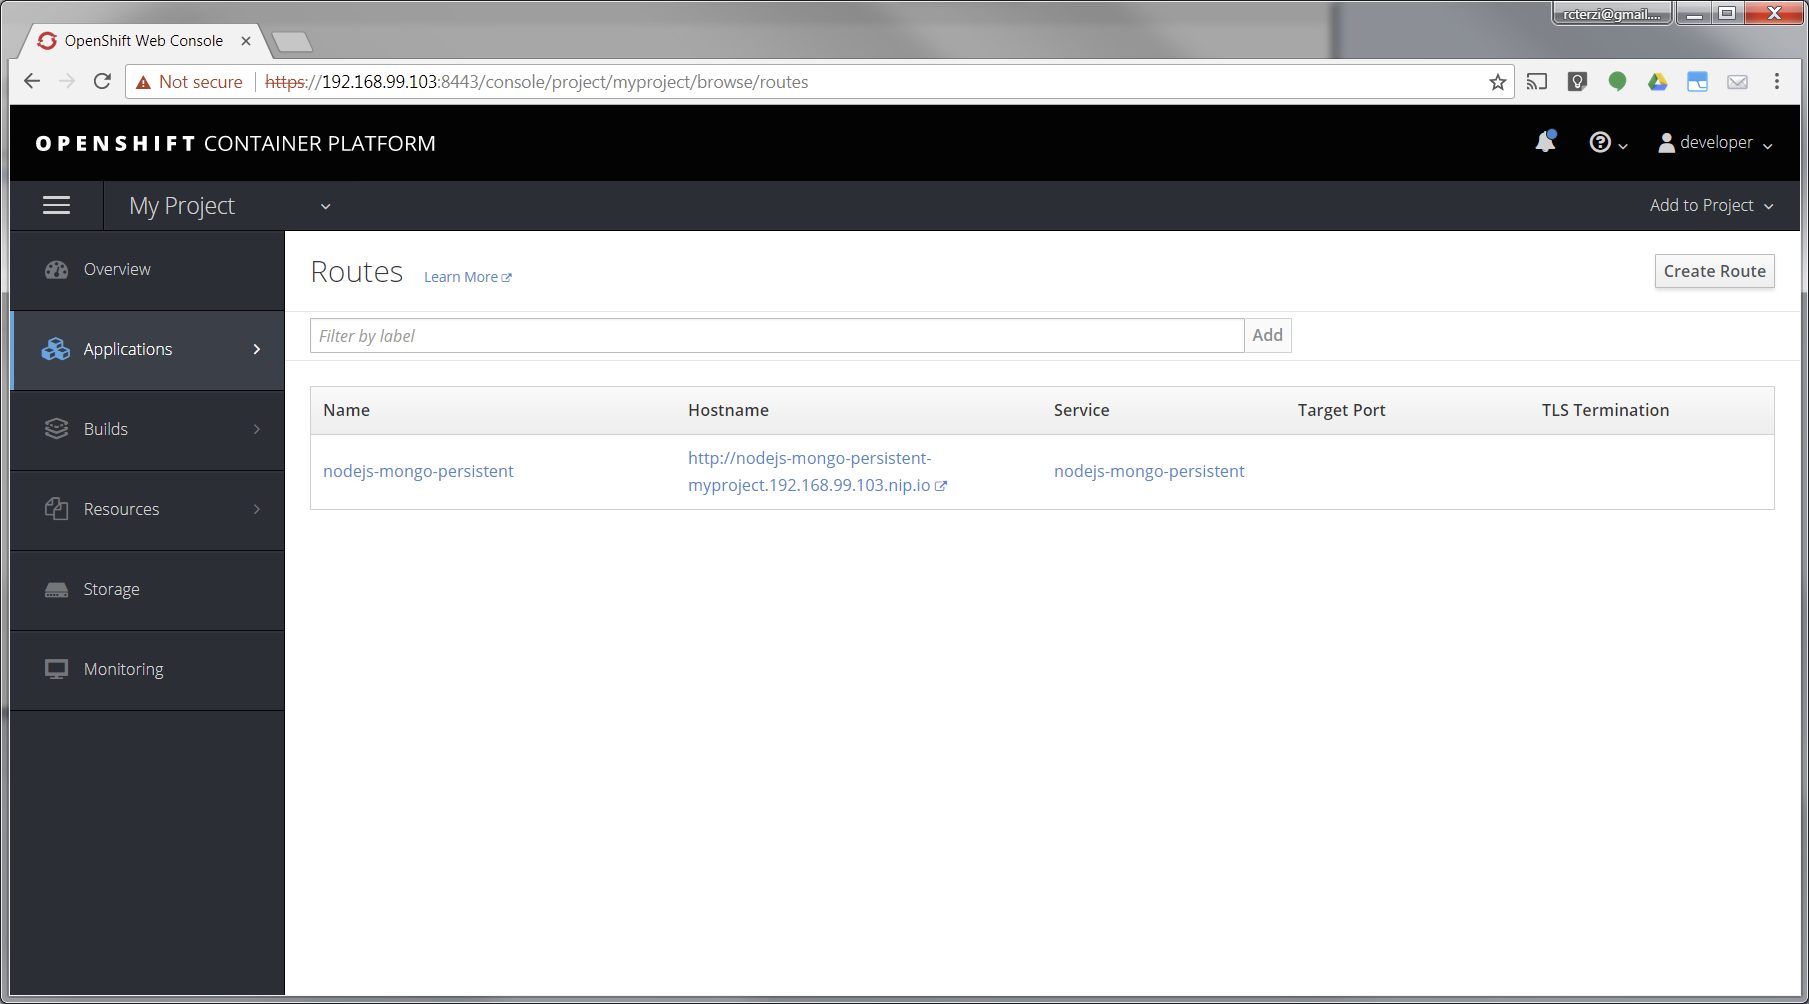
When the application is finished building and deploying you should see two running pods. Select Applications from the menu on the left. Then select Routes.
The application template created a route to allow HTTP traffic to the Node.js application pod running inside the OpenShift cluster. Click on the URL in the Hostname column to view your application.
At this point, you’ve successfully built and deployed a Node.js and MongoDB application in containers running on OpenShift on your personal OpenShift cluster. Explore the menus to see the components that were created, view logs, and explore OpenShift.
MICROSOFT AZURE ADMINISTRATOR @ prince sultan university
prince sultan university 2
This course teaches IT Professionals how to manage their Azure subscriptions, secure identities, administer the infrastructure, configure virtual networking, connect Azure and on-premises sites, manage network traffic, implement storage solutions, create and scale virtual machines, implement web apps and containers, back up and share data, and monitor your solution.
Module 1: Identity
In this module, you will learn how to secure identities with Azure Active Directory, and implement users and groups.
Azure Active Directory
Users and Groups
Lab : Manage Azure Active Directory Identities
After completing this module, students will be able to:
Secure and manage identities with Azure Active Directory.
Implement and manage users and groups.
Module 2: Governance and Compliance
In this module, you will learn about managing your subscriptions and accounts, implementing Azure policies, and using Role-Based Access Control.
Subscriptions and Accounts
Azure Policy
Role-based Access Control (RBAC)
Lab : Manage Subscriptions and RBAC
Lab : Manage Governance via Azure Policy
After completing this module, students will be able to:
Implement and manage Azure subscriptions and accounts.
Implement Azure Policy, including custom policies.
Use RBAC to assign permissions.
Module 3: Azure Administration
In this module, you will learn about the tools an Azure Administrator uses to manage their infrastructure. This includes the Azure Portal, Cloud Shell, Azure PowerShell, CLI, and Resource Manager Templates. This module includes:
Azure Resource Manager
Azure Portal and Cloud Shell
Azure PowerShell and CLI
ARM Templates
Lab : Manage Azure resources by Using the Azure Portal
Lab : Manage Azure resources by Using ARM Templates
Lab : Manage Azure resources by Using Azure PowerShell
Lab : Manage Azure resources by Using Azure CLI
After completing this module, students will be able to:
Leverage Azure Resource Manager to organize resources.
Use the Azure Portal and Cloud Shell.
Use Azure PowerShell and CLI.
Use ARM Templates to deploy resources.
Module 4: Virtual Networking
In this module, you will learn about basic virtual networking concepts like virtual networks and subnetting, IP addressing, network security groups, Azure Firewall, and Azure DNS,
Virtual Networks
IP Addressing
Network Security groups
Azure Firewall
Azure DNS
Lab : Implement Virtual Networking
After completing this module, students will be able to:
Implement virtual networks and subnets.
Configure public and private IP addressing.
Configure network security groups.
Configure Azure Firewall.
Configure private and public DNS zones.
Module 5: Intersite Connectivity
In this module, you will learn about intersite connectivity features including VNet Peering, Virtual Network Gateways, and Site-to-Site Connections.
VNet Peering
VPN Gateway Connections
ExpressRoute and Virtual WAN
Lab : Implement Intersite Connectivity
After completing this module, students will be able to:
Configure VNet Peering.
Configure VPN gateways.
Choose the appropriate intersite connectivity solution.
Module 6: Network Traffic Management
In this module, you will learn about network traffic strategies including network routing and service endpoints, Azure Load Balancer, Azure Application Gateway, and Traffic Manager.
Network Routing and Endpoints
Azure Load Balancer
Azure Application Gateway
Traffic Manager
Lab : Implement Traffic Management
After completing this module, students will be able to:
Configure network routing including custom routes and service endpoints.
Configure an Azure Load Balancer.
Configure and Azure Application Gateway.
Choose the appropriate network traffic solution.
Module 7: Azure Storage
In this module, you will learn about basic storage features including storage accounts, blob storage, Azure files and File Sync, storage security, and storage tools.
Storage Accounts
Blob Storage
Storage Security
Azure Files and File Sync
Managing Storage
Lab : Manage Azure storage
After completing this module, students will be able to:
Create Azure storage accounts.
Configure blob containers.
Secure Azure storage.
Configure Azure files shares and file sync.
Manage storage with tools such as Storage Explorer.
Module 8: Azure Virtual Machines
In this module, you will learn about Azure virtual machines including planning, creating, availability and extensions.
Virtual Machine Planning
Creating Virtual Machines
Virtual Machine Availability
Virtual Machine Extensions
Lab : Manage virtual machines
After completing this module, students will be able to:
Plan for virtual machine implementations.
Create virtual machines.
Configure virtual machine availability, including scale sets.
Use virtual machine extensions.
Module 9: Serverless Computing
In this module, you will learn administer serverless computing features like Azure App Service, Azure Container Instances, and Kubernetes.
Azure App Service Plans
Azure App Service
Container Services
Azure Kubernetes Service
Lab : Implement Web Apps
Lab : Implement Azure Container Instances
Lab : Implement Azure Kubernetes Service
After completing this module, students will be able to:
Create an app service plan.
Create a web app.
Implement Azure Container Instances.
Implement Azure Kubernetes Service.
Module 10: Data Protection
In this module, you will learn about backing up files and folders, and virtual machine backups.
File and Folder Backups
Virtual Machine Backups
Lab : Implement Data Protection
After completing this module, students will be able to:
Backup and restore file and folders.
Backup and restore virtual machines.
Module 11: Monitoring
In this module, you will learn about monitoring your Azure infrastructure including Azure Monitor, alerting, and log analytics.
Azure Monitor
Azure Alerts
Log Analytics
Network Watcher
Lab : Implement Monitoring
After completing this module, students will be able to:


