Inquisitive and passionate about emerging technology.
I’m Tom Latham, a Senior UX Designer with over 14 years of hands-on experience in User Experience, Product Analytics, and Strategic Thinking.
Currently, I’m dedicated to creating user experiences that harness AI to enhance data visualization, predictive modeling, and insights for users across various domains at Qlik.
For a more comprehensive understanding of my qualifications and career achievements, please visit my LinkedIn profile .
Maecenas finibus nec sem ut imperdiet. Ut tincidunt est ac dolor aliquam
sodales. Phasellus sed mauris hendrerit, laoreet sem in, lobortis mauris
hendrerit ante. Ut tincidunt est ac dolor aliquam sodales phasellus smauris test
Bound - Trolola
Jone Duone Joe
Operating Officer
Web App Development
Upwork - Mar 4, 2016 - Aug 30, 2021
Maecenas finibus nec sem ut imperdiet. Ut tincidunt est ac dolor aliquam
sodales. Phasellus sed mauris hendrerit, laoreet sem in, lobortis mauris
hendrerit ante. Ut tincidunt est ac dolor aliquam sodales phasellus smauris
Glassfisom
Nevine Dhawan
CEO Of Officer
Android App Design
Upwork - Mar 4, 2016 - Aug 30, 2021
Maecenas finibus nec sem ut imperdiet. Ut tincidunt est ac dolor aliquam
sodales. Phasellus sed mauris hendrerit, laoreet sem in, lobortis mauris
hendrerit ante. Ut tincidunt est ac dolor aliquam sodales phasellus smauris
MICROSOFT AZURE ADMINISTRATOR @ prince sultan university
prince sultan university 2
This course teaches IT Professionals how to manage their Azure subscriptions, secure identities, administer the infrastructure, configure virtual networking, connect Azure and on-premises sites, manage network traffic, implement storage solutions, create and scale virtual machines, implement web apps and containers, back up and share data, and monitor your solution.
Module 1: Identity
In this module, you will learn how to secure identities with Azure Active Directory, and implement users and groups.
Azure Active Directory
Users and Groups
Lab : Manage Azure Active Directory Identities
After completing this module, students will be able to:
Secure and manage identities with Azure Active Directory.
Implement and manage users and groups.
Module 2: Governance and Compliance
In this module, you will learn about managing your subscriptions and accounts, implementing Azure policies, and using Role-Based Access Control.
Subscriptions and Accounts
Azure Policy
Role-based Access Control (RBAC)
Lab : Manage Subscriptions and RBAC
Lab : Manage Governance via Azure Policy
After completing this module, students will be able to:
Implement and manage Azure subscriptions and accounts.
Implement Azure Policy, including custom policies.
Use RBAC to assign permissions.
Module 3: Azure Administration
In this module, you will learn about the tools an Azure Administrator uses to manage their infrastructure. This includes the Azure Portal, Cloud Shell, Azure PowerShell, CLI, and Resource Manager Templates. This module includes:
Azure Resource Manager
Azure Portal and Cloud Shell
Azure PowerShell and CLI
ARM Templates
Lab : Manage Azure resources by Using the Azure Portal
Lab : Manage Azure resources by Using ARM Templates
Lab : Manage Azure resources by Using Azure PowerShell
Lab : Manage Azure resources by Using Azure CLI
After completing this module, students will be able to:
Leverage Azure Resource Manager to organize resources.
Use the Azure Portal and Cloud Shell.
Use Azure PowerShell and CLI.
Use ARM Templates to deploy resources.
Module 4: Virtual Networking
In this module, you will learn about basic virtual networking concepts like virtual networks and subnetting, IP addressing, network security groups, Azure Firewall, and Azure DNS,
Virtual Networks
IP Addressing
Network Security groups
Azure Firewall
Azure DNS
Lab : Implement Virtual Networking
After completing this module, students will be able to:
Implement virtual networks and subnets.
Configure public and private IP addressing.
Configure network security groups.
Configure Azure Firewall.
Configure private and public DNS zones.
Module 5: Intersite Connectivity
In this module, you will learn about intersite connectivity features including VNet Peering, Virtual Network Gateways, and Site-to-Site Connections.
VNet Peering
VPN Gateway Connections
ExpressRoute and Virtual WAN
Lab : Implement Intersite Connectivity
After completing this module, students will be able to:
Configure VNet Peering.
Configure VPN gateways.
Choose the appropriate intersite connectivity solution.
Module 6: Network Traffic Management
In this module, you will learn about network traffic strategies including network routing and service endpoints, Azure Load Balancer, Azure Application Gateway, and Traffic Manager.
Network Routing and Endpoints
Azure Load Balancer
Azure Application Gateway
Traffic Manager
Lab : Implement Traffic Management
After completing this module, students will be able to:
Configure network routing including custom routes and service endpoints.
Configure an Azure Load Balancer.
Configure and Azure Application Gateway.
Choose the appropriate network traffic solution.
Module 7: Azure Storage
In this module, you will learn about basic storage features including storage accounts, blob storage, Azure files and File Sync, storage security, and storage tools.
Storage Accounts
Blob Storage
Storage Security
Azure Files and File Sync
Managing Storage
Lab : Manage Azure storage
After completing this module, students will be able to:
Create Azure storage accounts.
Configure blob containers.
Secure Azure storage.
Configure Azure files shares and file sync.
Manage storage with tools such as Storage Explorer.
Module 8: Azure Virtual Machines
In this module, you will learn about Azure virtual machines including planning, creating, availability and extensions.
Virtual Machine Planning
Creating Virtual Machines
Virtual Machine Availability
Virtual Machine Extensions
Lab : Manage virtual machines
After completing this module, students will be able to:
Plan for virtual machine implementations.
Create virtual machines.
Configure virtual machine availability, including scale sets.
Use virtual machine extensions.
Module 9: Serverless Computing
In this module, you will learn administer serverless computing features like Azure App Service, Azure Container Instances, and Kubernetes.
Azure App Service Plans
Azure App Service
Container Services
Azure Kubernetes Service
Lab : Implement Web Apps
Lab : Implement Azure Container Instances
Lab : Implement Azure Kubernetes Service
After completing this module, students will be able to:
Create an app service plan.
Create a web app.
Implement Azure Container Instances.
Implement Azure Kubernetes Service.
Module 10: Data Protection
In this module, you will learn about backing up files and folders, and virtual machine backups.
File and Folder Backups
Virtual Machine Backups
Lab : Implement Data Protection
After completing this module, students will be able to:
Backup and restore file and folders.
Backup and restore virtual machines.
Module 11: Monitoring
In this module, you will learn about monitoring your Azure infrastructure including Azure Monitor, alerting, and log analytics.
Azure Monitor
Azure Alerts
Log Analytics
Network Watcher
Lab : Implement Monitoring
After completing this module, students will be able to:
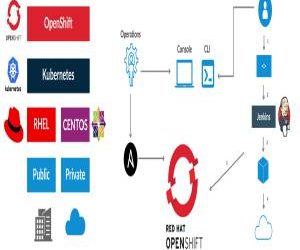
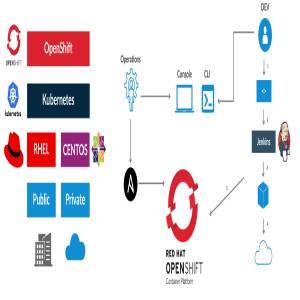
CDK 3: Build your first application using the OpenShift Console
The following steps will guide you through creating your first project on Red Hat OpenShift Container Platform, which is running inside the Red Hat Container Development Kit on the minishift virtual machine. The project is a Node.js “Hello, World” application that displays the current hit count. A MongoDB database is used to store the hit count. Two pods will be created, one for the Node.js application and another for the database.
The source code for the project is available on GitHub: openshift/nodejs-ex. The OpenShift catalog in CDK has a number of project templates available including this sample Node.js application. For this guide, we will use the template from the OpenShift catalog. You will use the OpenShift web console to build and manage your application.
Note: This guide uses the OpenShift web console to build and manage your application. Alternatively you could use the oc CLI to accomplish the same steps. The following command would create the application pulling the source from GitHub:$ oc new-app https://github.com/openshift/nodejs-ex
Once the VM is up and running, launch the web console in the browser:$ minishift console
Note: The web console may not launch on some older versions of Safari. You can get the URL to use with a different browser using the following command:$ minishift console –url
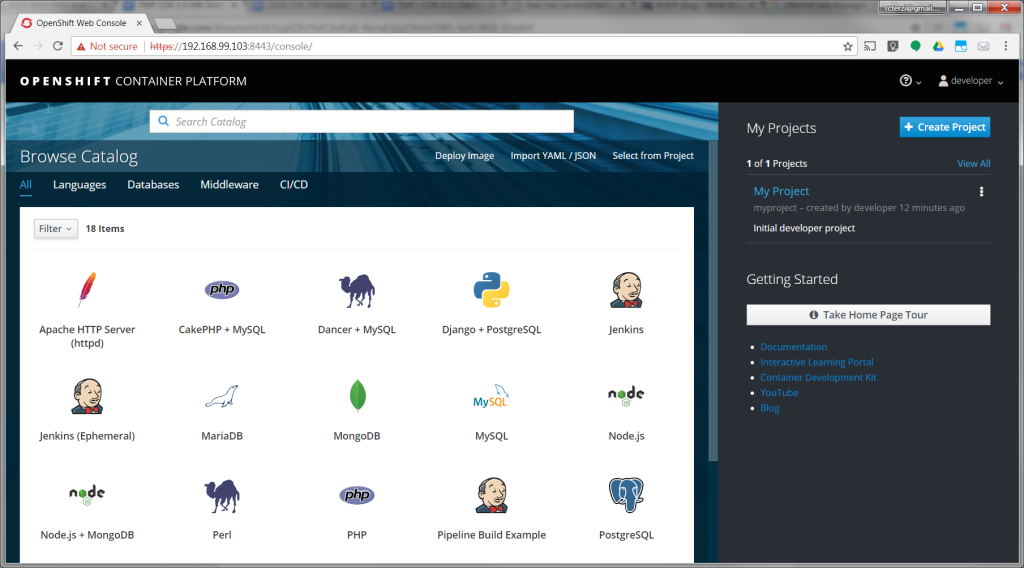
Log into the OpenShift console with developer as the username and any text for the password. A default empty project called My Project has been created for you. Alternatively, you can use the create project button to create a new empty project at any time.
Create the application
Follow these steps to create, build, and deploy the application:
After logging in you will see a page with the OpenShift catalog of application templates that have been preloaded into CDK.
Click on the icon labeled Node.js + MongoDB. Then, click Next to view the project configuration information.
None of the defaults need to be changed, so click Create to create the application. This will create the application and kick off a build. Click Close to dismiss the create dialog box.
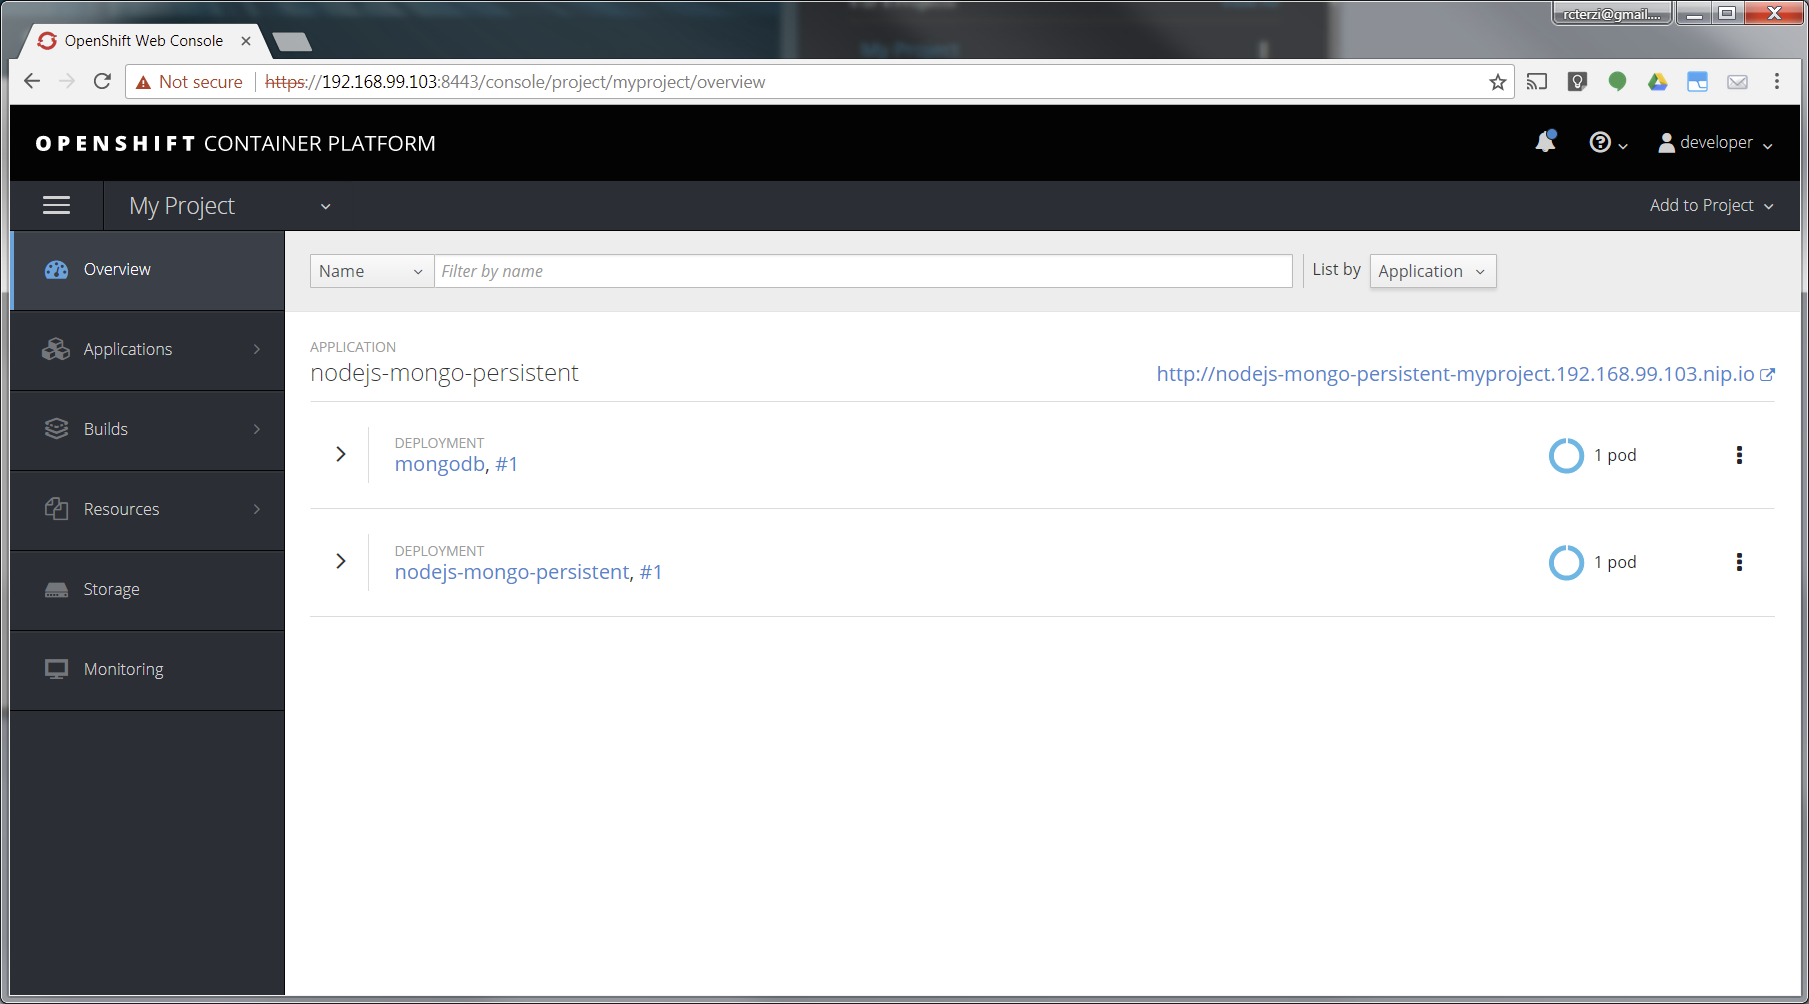
Go to your project overview page by clicking My Project from the list of projects on the right.
The application will be automatically built and deployed. You might need to wait for the build to finish.
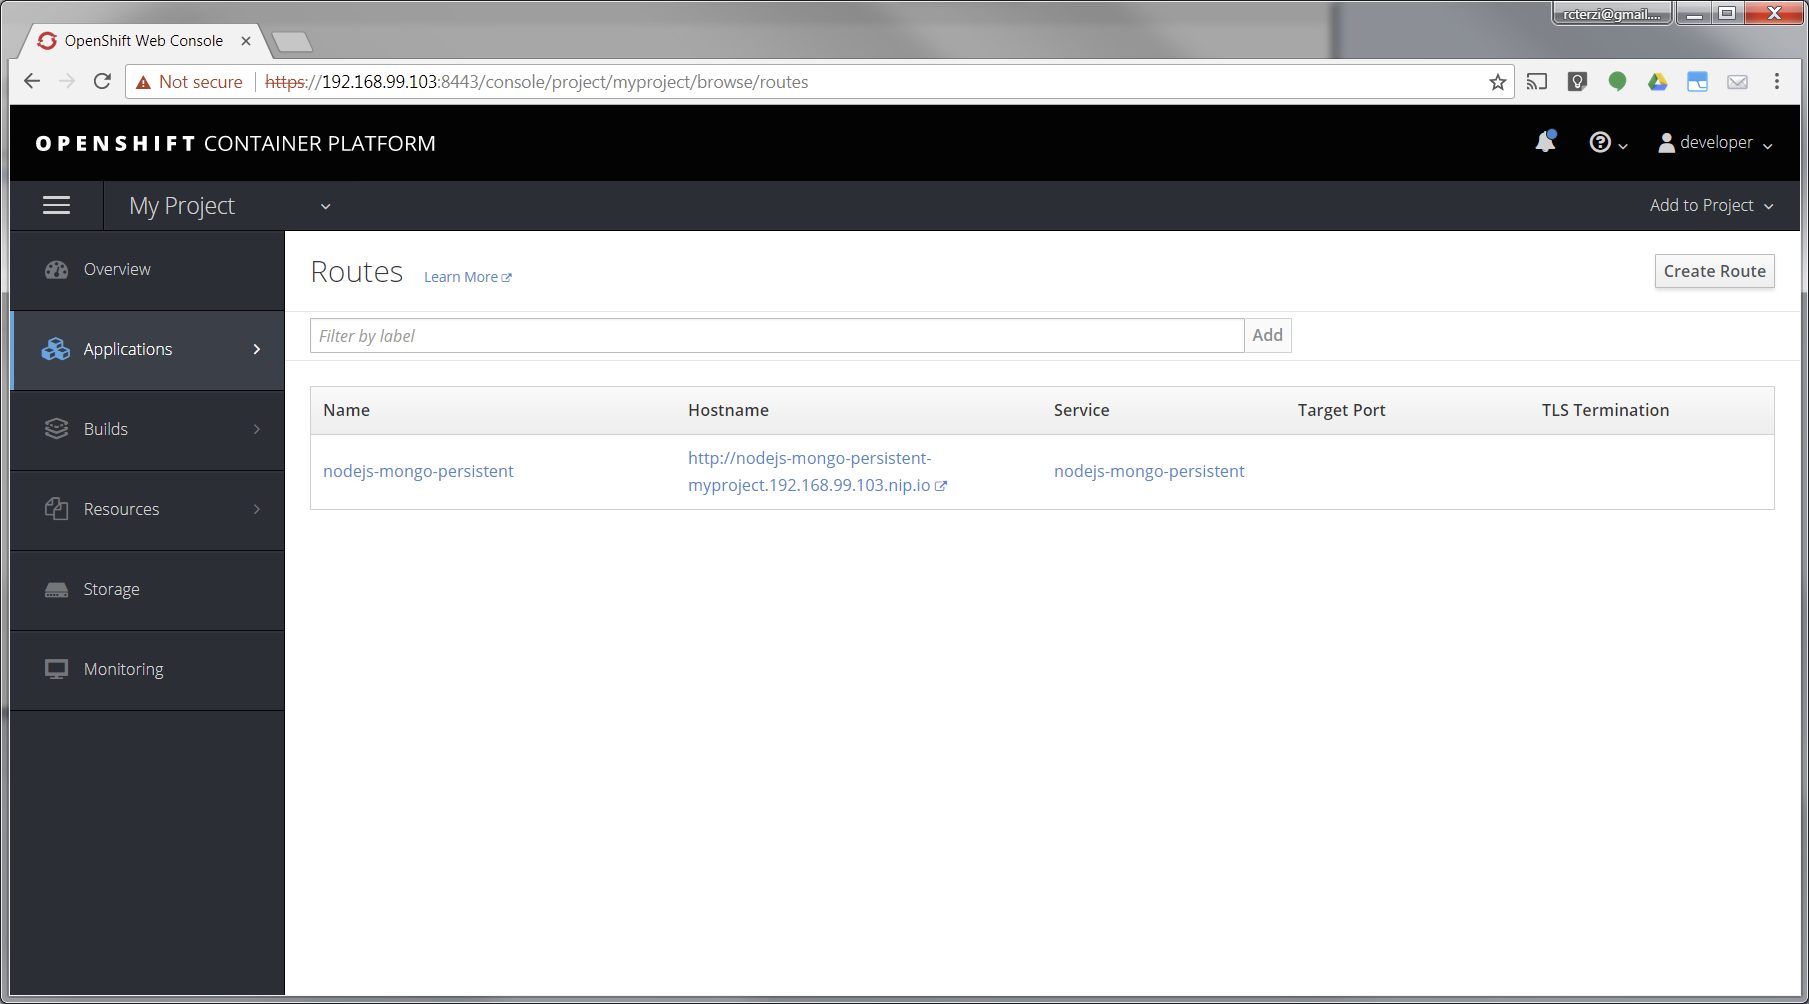
When the application is finished building and deploying you should see two running pods. Select Applications from the menu on the left. Then select Routes.
The application template created a route to allow HTTP traffic to the Node.js application pod running inside the OpenShift cluster. Click on the URL in the Hostname column to view your application.
At this point, you’ve successfully built and deployed a Node.js and MongoDB application in containers running on OpenShift on your personal OpenShift cluster. Explore the menus to see the components that were created, view logs, and explore OpenShift.
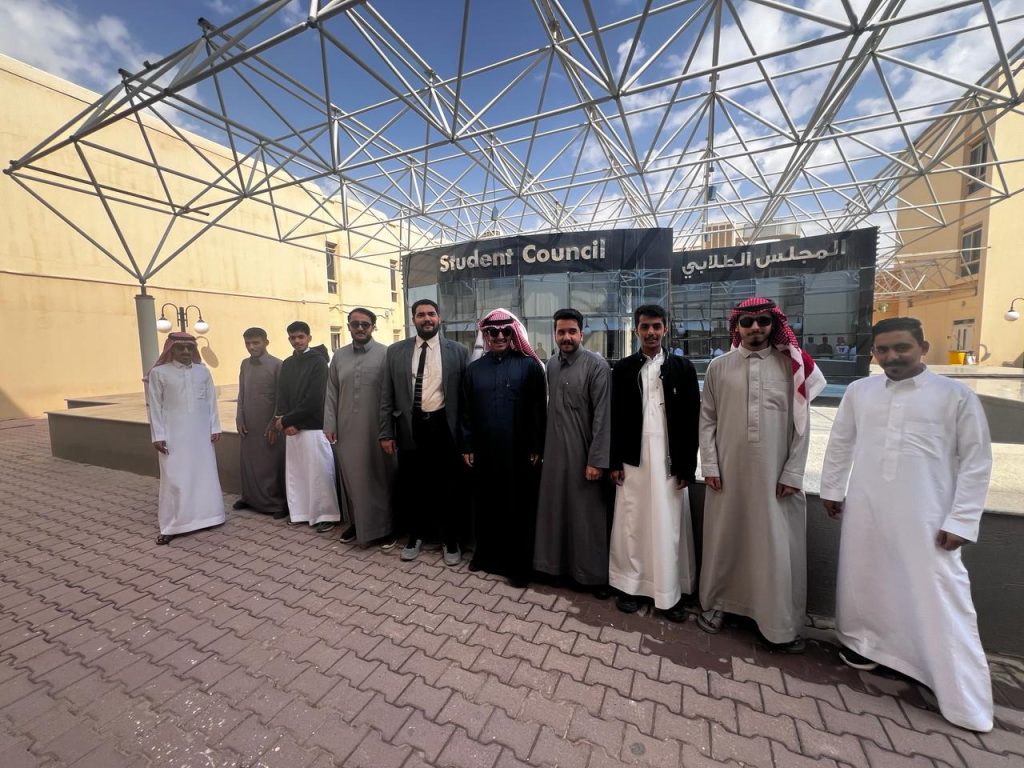
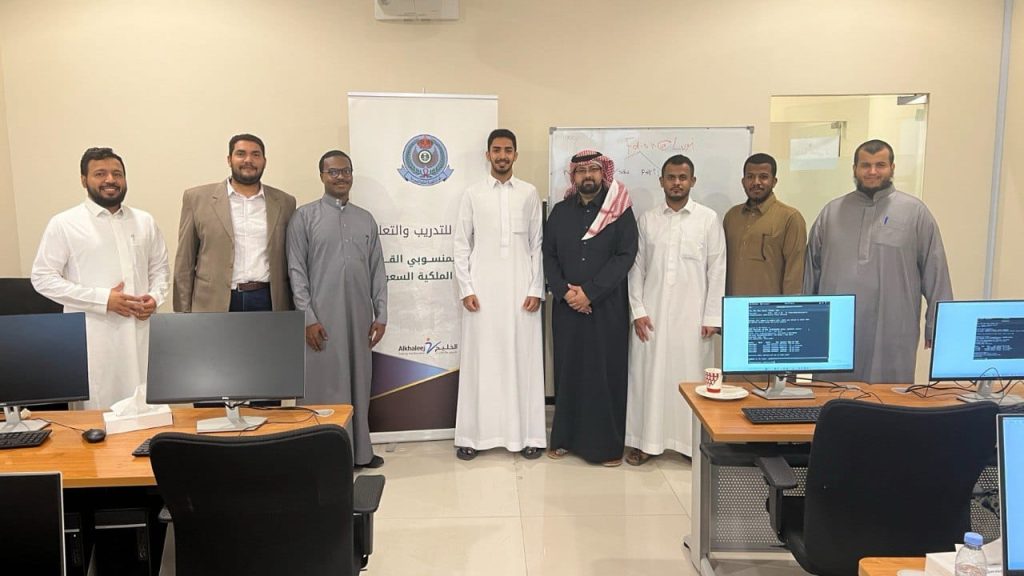
Redhat full path tranining for Royal Saudi Air Defense Forces(الدفاع الجوي الملكي السعودي)
2023
There are many variations of passages of Lorem Ipsum available, but the majority have suffered alteration in some form, by injected humour, or randomised words which don’t look even slightly believable. If you are going to use a passage of Lorem Ipsum. You need to be sure there isn’t anything embarrassing hidden in the middle of text. All the Lorem Ipsum generators on the Internet tend toitrrepeat predefined chunks.
Course description
The first of two courses covering the core system administration tasks needed to manage Red Hat Enterprise Linux servers
Red Hat System Administration I (RH124) is designed for IT professionals without previous Linux system administration experience. The course provides students with Linux administration competence by focusing on core administration tasks. This course also provides a foundation for students who plan to become full-time Linux system administrators by introducing key command-line concepts and enterprise-level tools.
This course is the first of a two-course series that takes a computer professional without Linux system administration knowledge to become a fully capable Linux administrator. These concepts are further developed in the follow-on course, Red Hat System Administration II (RH134).
This course is based on Red Hat® Enterprise Linux 9.0.
Following course completion, you will receive a 45-day extended access to hands-on labs for any course that includes a virtual environment.Note: This course is offered as a five day in person class, a five day virtual class or is self-paced. Durations may vary based on the delivery. For full course details, scheduling, and pricing, select your location then “get started” on the right hand menu.
Course content summary
Introduce Linux and the Red Hat Enterprise Linux ecosystem.
Run commands and view shell environments.
Manage, organize, and secure files.
Manage users, groups and user security policies.
Control and monitor systemd services.
Configure remote access using the web console and SSH.
Configure network interfaces and settings.
Manage software using DNF
Audience for this course
The primary persona is a technical professional with current or pending responsibilities as a Linux enterprise or cloud system administrator.
This course is popular in Red Hat Academy, and is targeted at the student who is planning to become a technical professional using Linux.
Technology considerations
There are no special technical requirements for this course.
This course is not designed for bring your own device (BYOD).
Internet access is not required but is recommended so that students can research and browse Red Hat online resources.
Outline for this course Get started with Red Hat Enterprise Linux Describe and define open source, Linux, Linux distributions, and Red Hat Enterprise Linux Access the command line Log into a Linux system and run simple commands using the shell. Manage files from the command line Copy, move, create, delete, and organize files while working from the bash shell. Get help in Red Hat Enterprise Linux Resolve problems by using local help systems. Create, view, and edit text files Manage text files from command output or in a text editor. Manage local users and groups Create, manage, and delete local users and groups, as well as administer local password policies. Control access to files Set Linux file system permissions on files and interpret the security effects of different permission settings. Monitor and manage Linux processes Evaluate and control processes running on a Red Hat Enterprise Linux system. Control services and daemons Control and monitor network services and system daemons with the systemd service. Configure and secure SSH Configure secure command line service on remote systems, using OpenSSH. Analyze and store logs Locate and accurately interpret logs of system events for troubleshooting purposes. Manage networking Configure network interfaces and settings on Red Hat Enterprise Linux servers. Install and update software packages Download, install, update, and manage software packages from Red Hat and DNF package repositories. Access Linux files systems Access, inspect, and use existing file systems on storage attached to a Linux server. Analyze servers and get support Investigate and resolve issues in the web-based management interface, getting support from Red Hat to help solve problems. Comprehensive review Review the content covered in this course by completing hands-on exercises.


